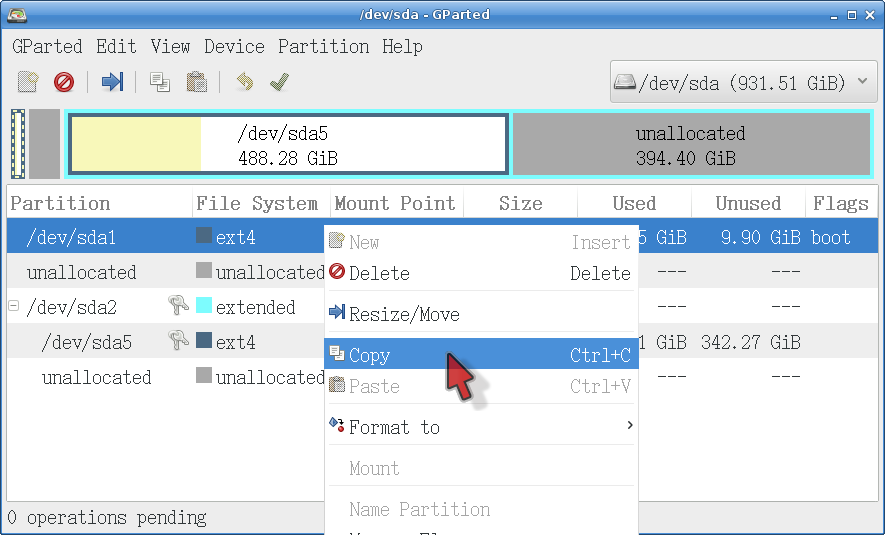
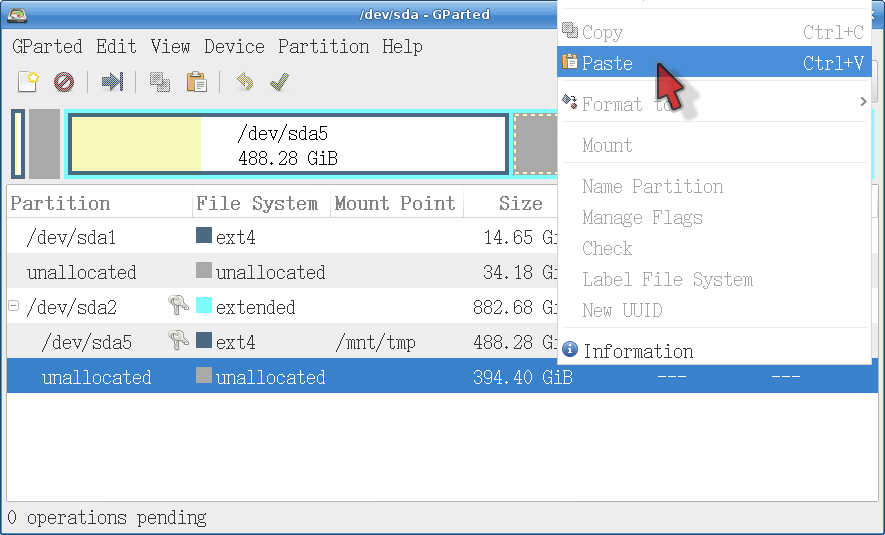
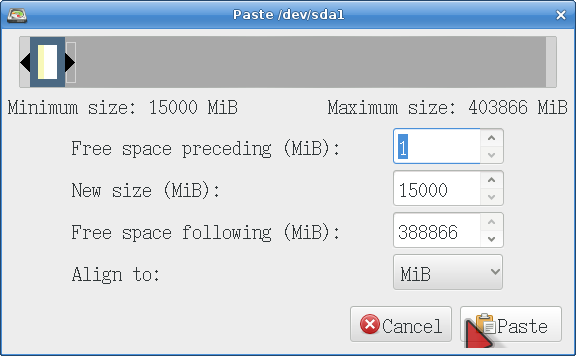
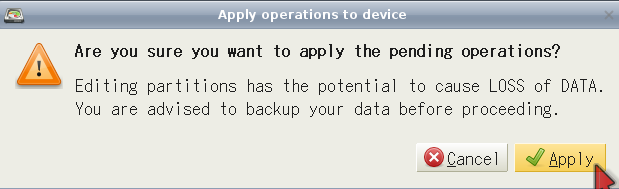
<?xml version="1.0" encoding="UTF-8"?>
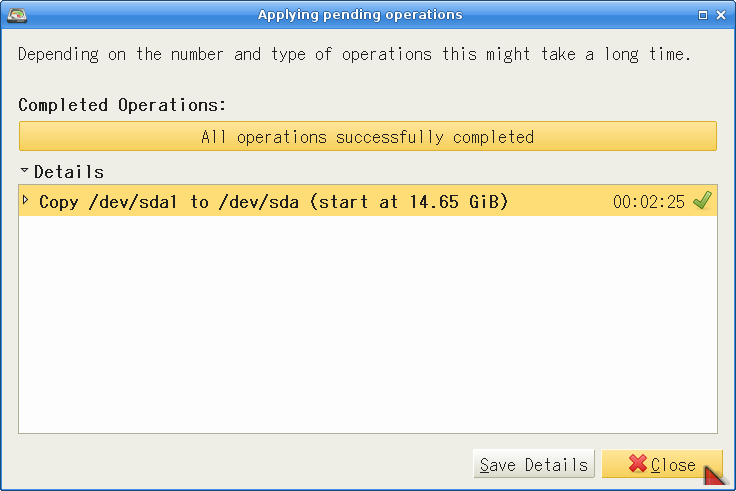
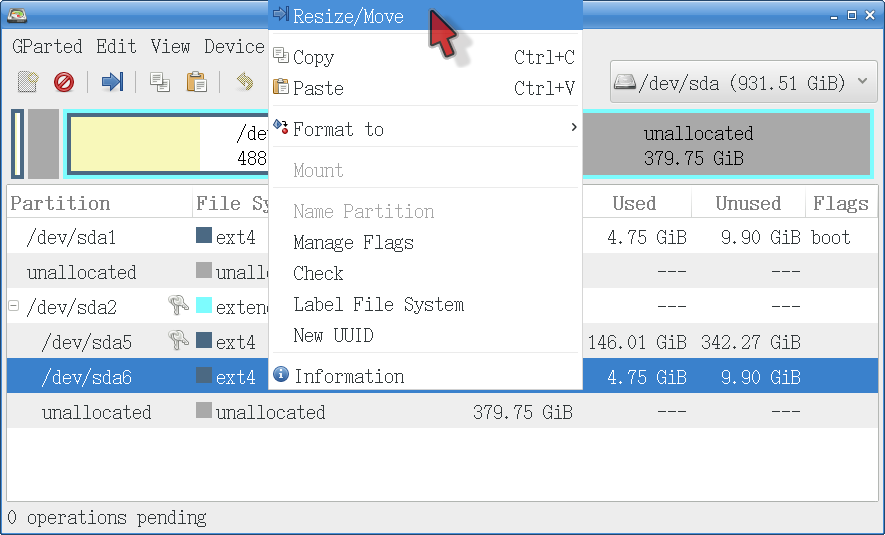
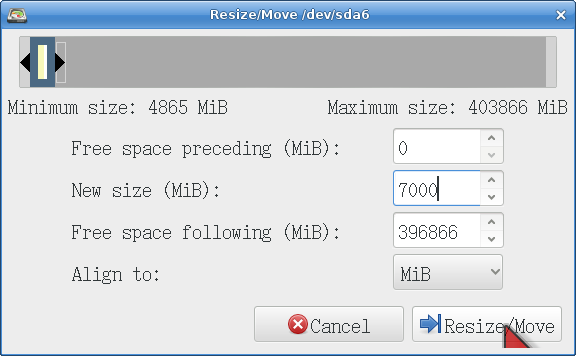
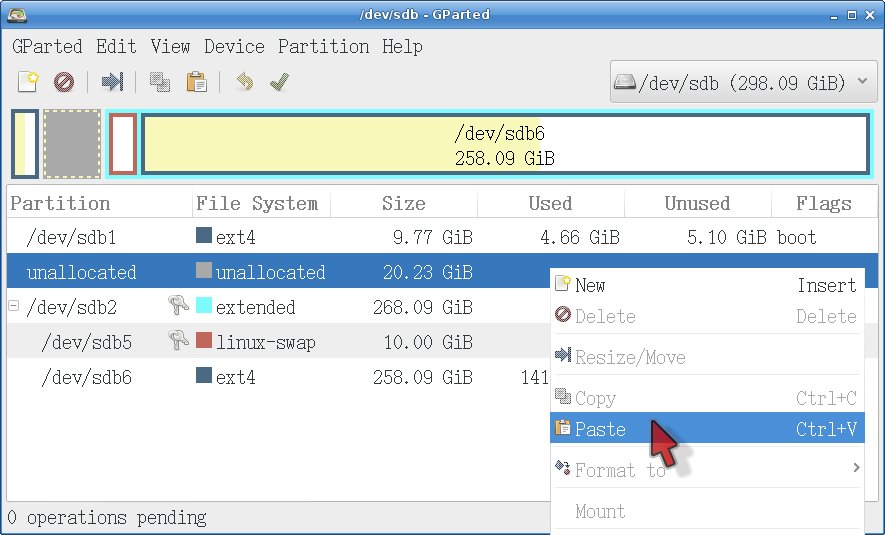
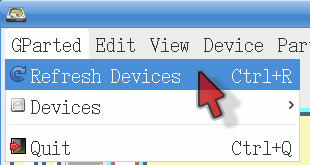
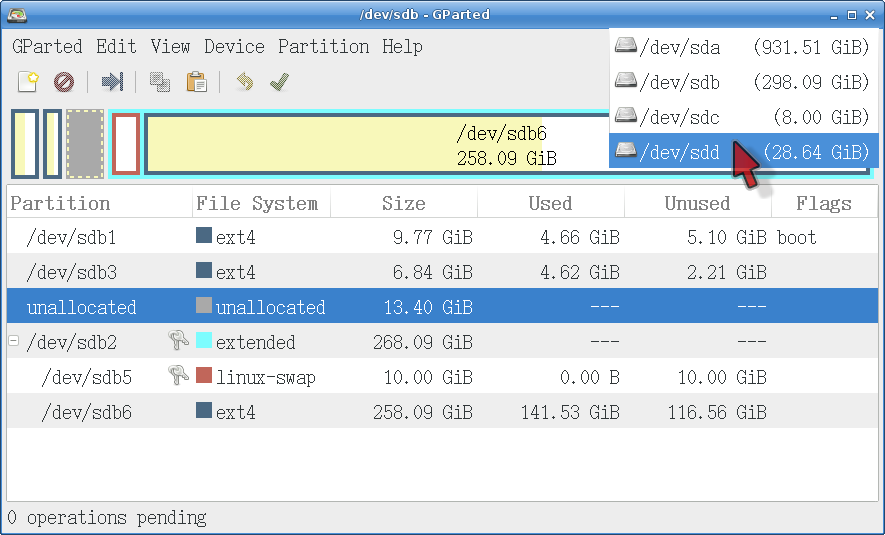
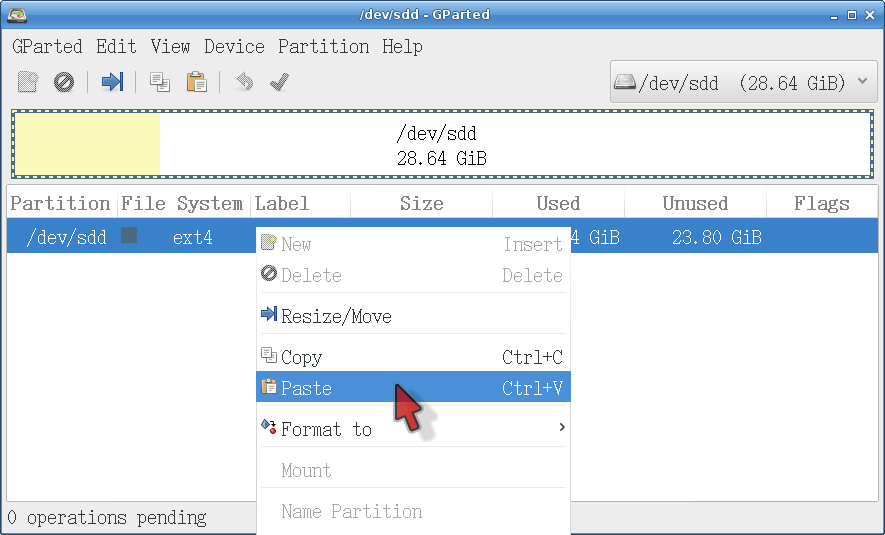
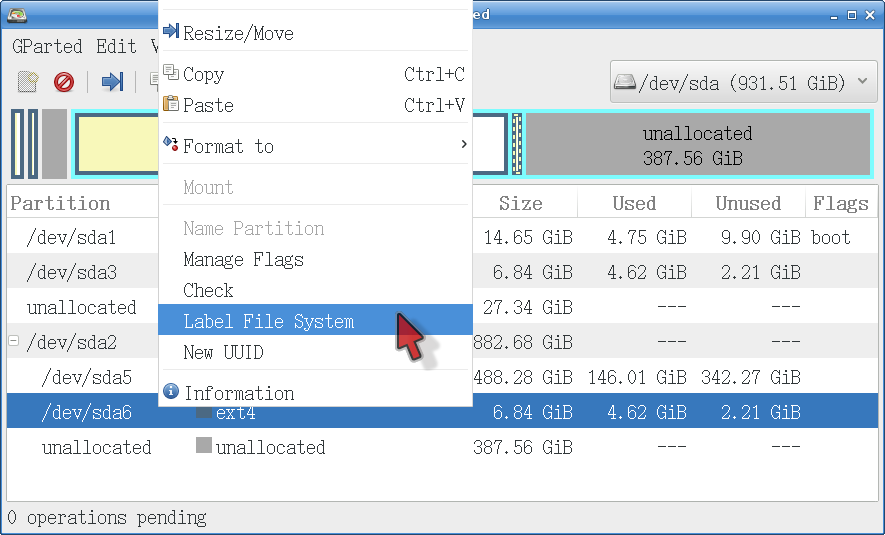
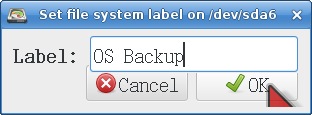
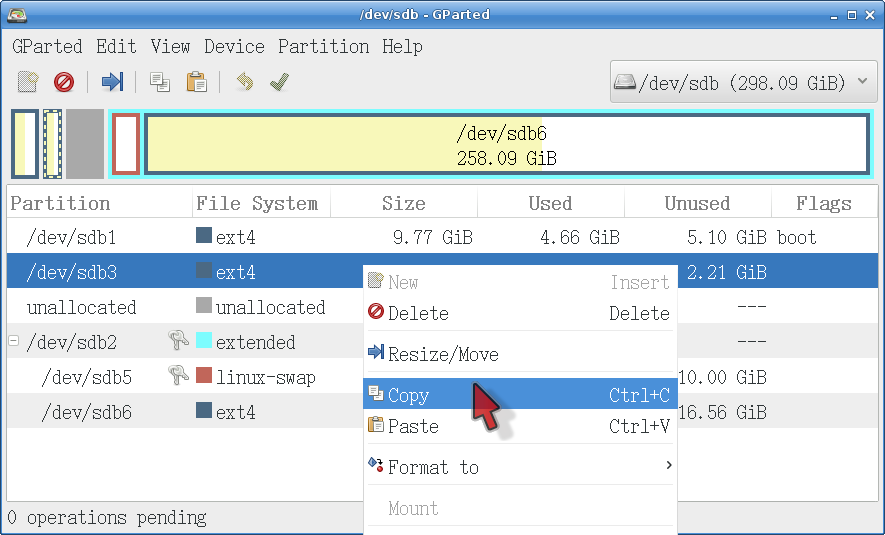
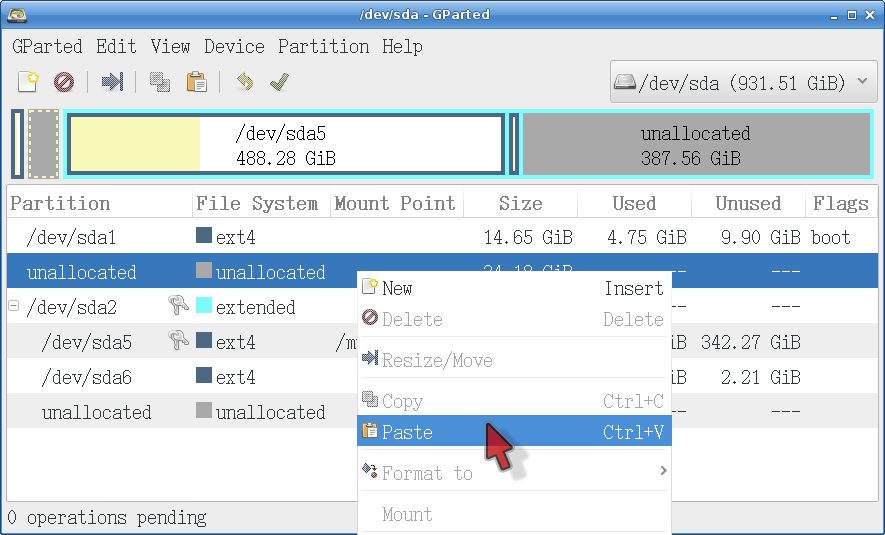
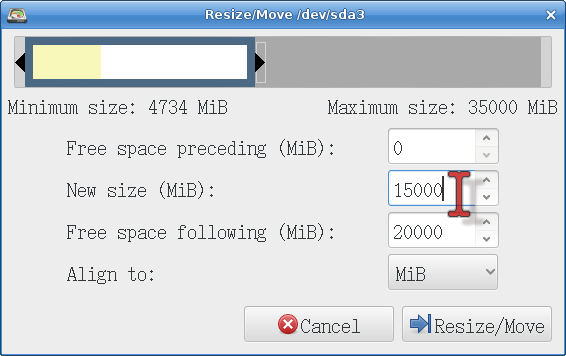
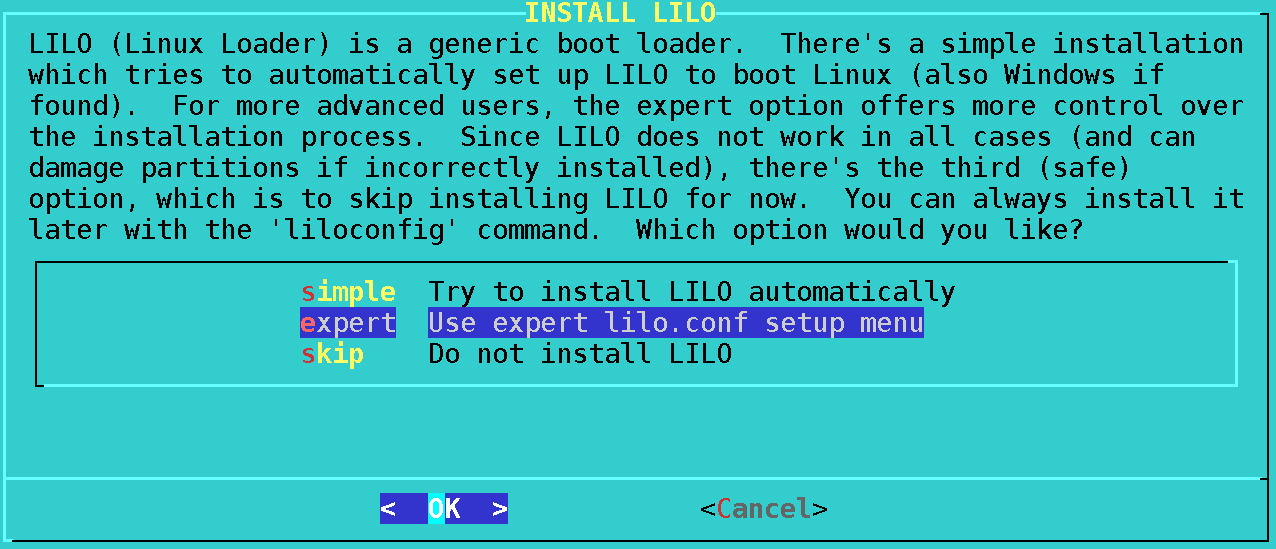
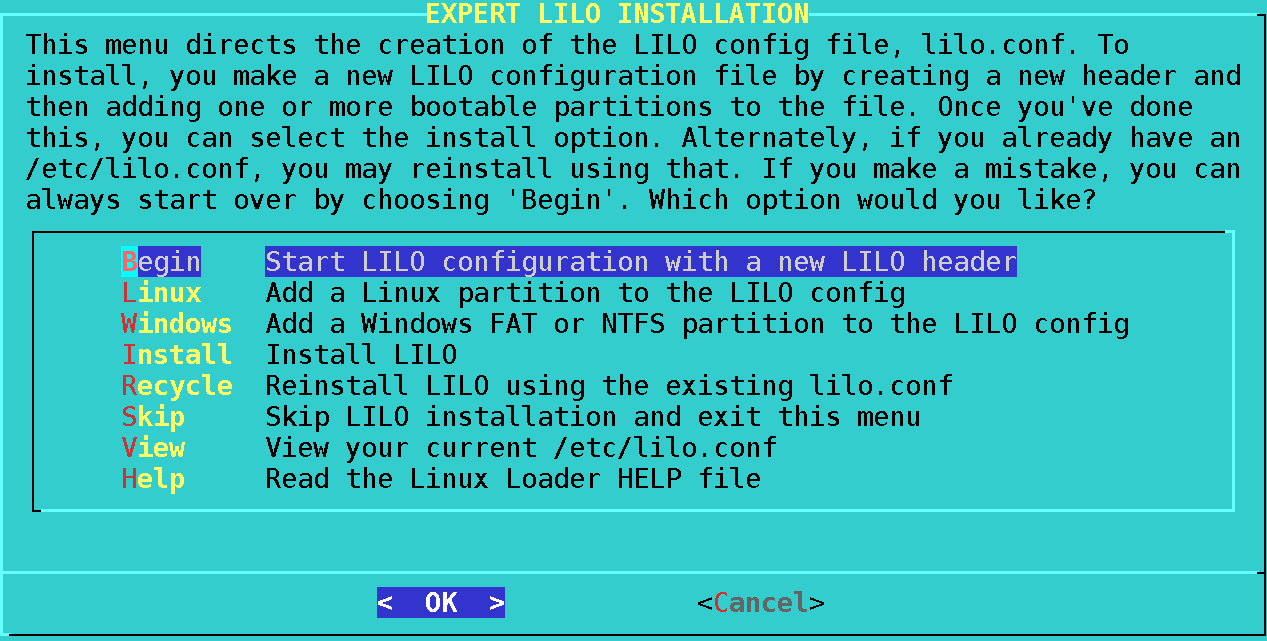
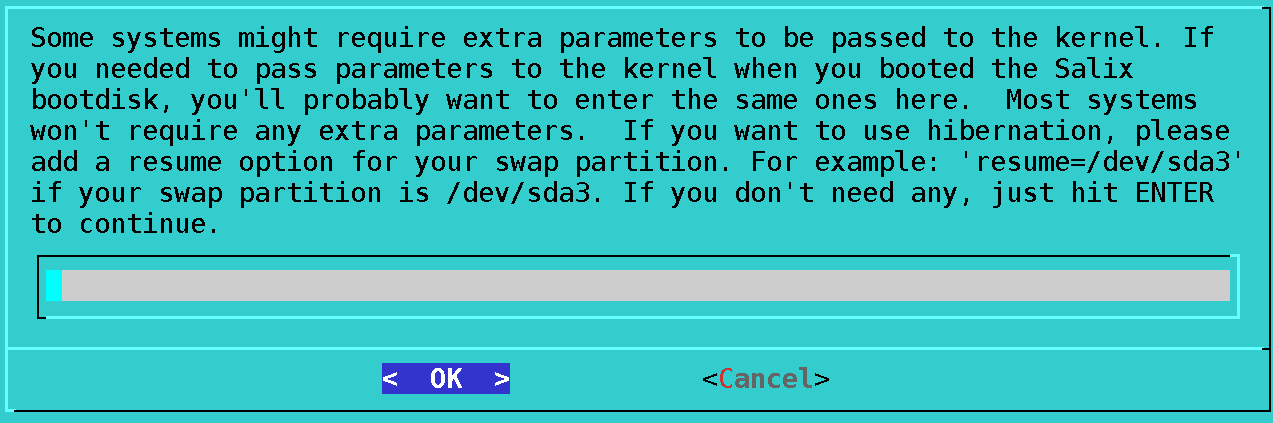
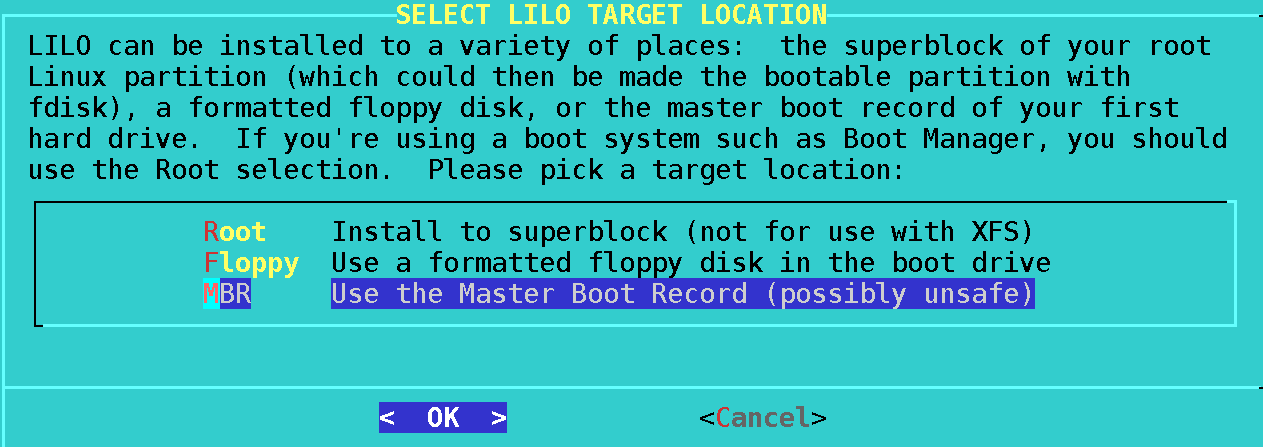
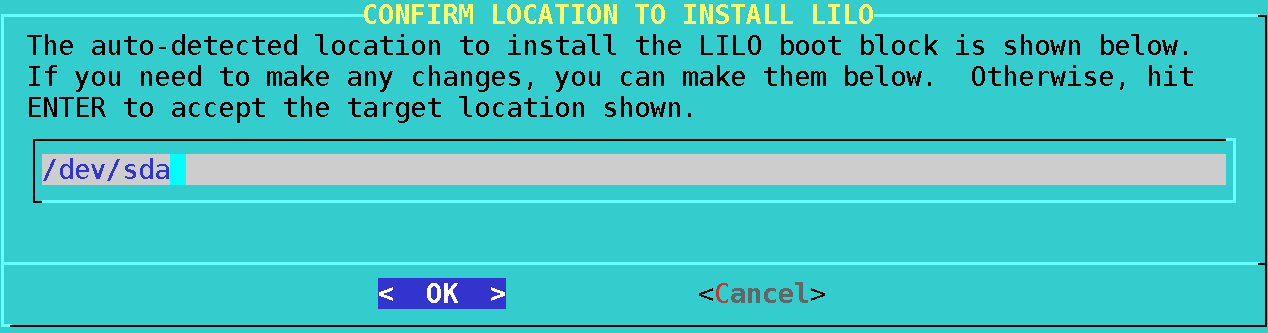
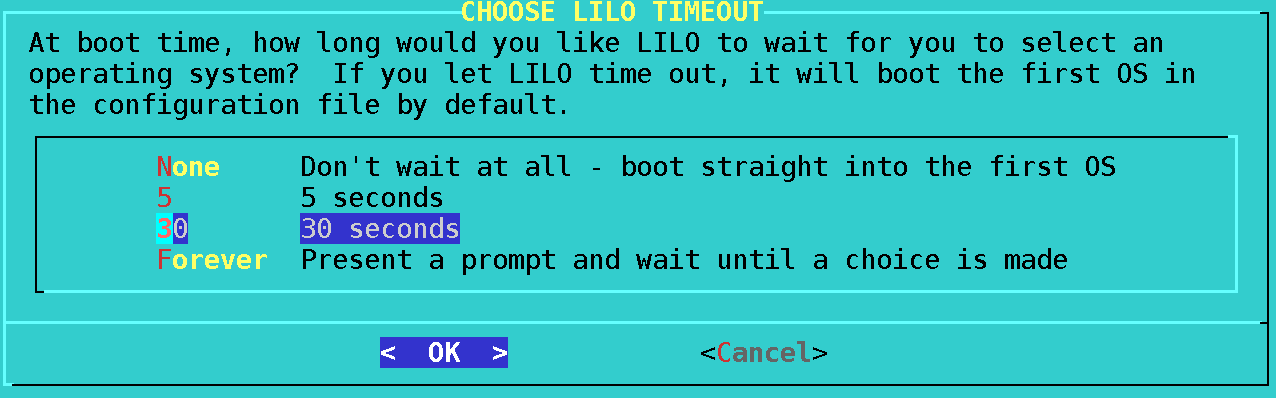
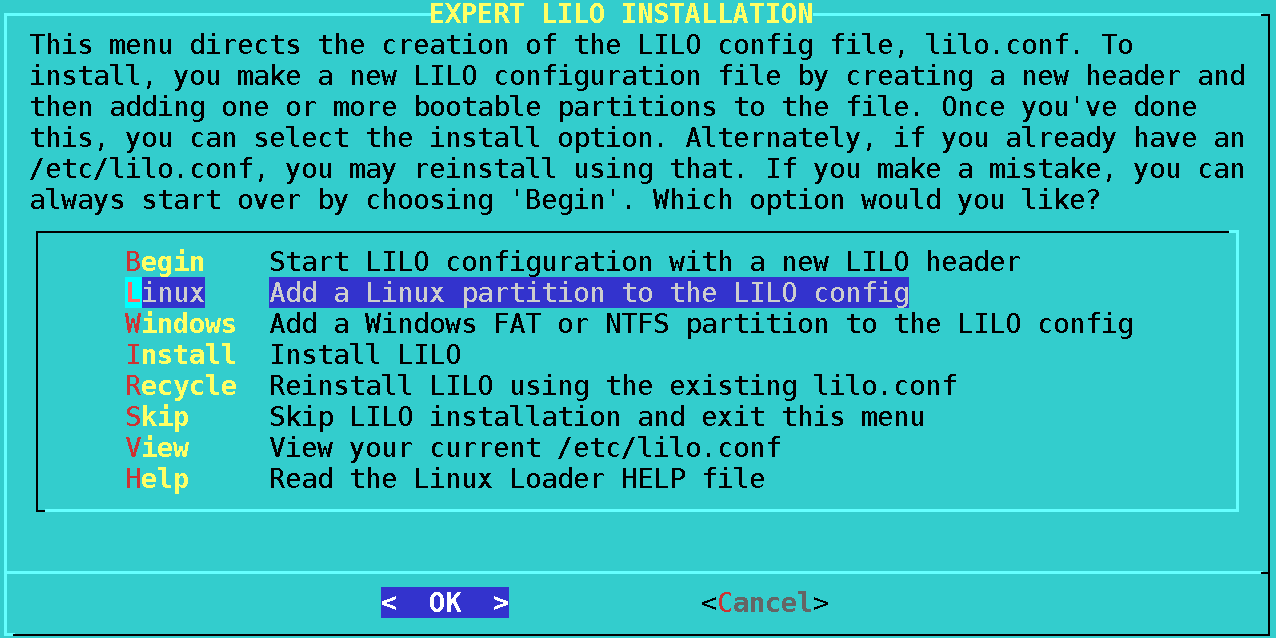
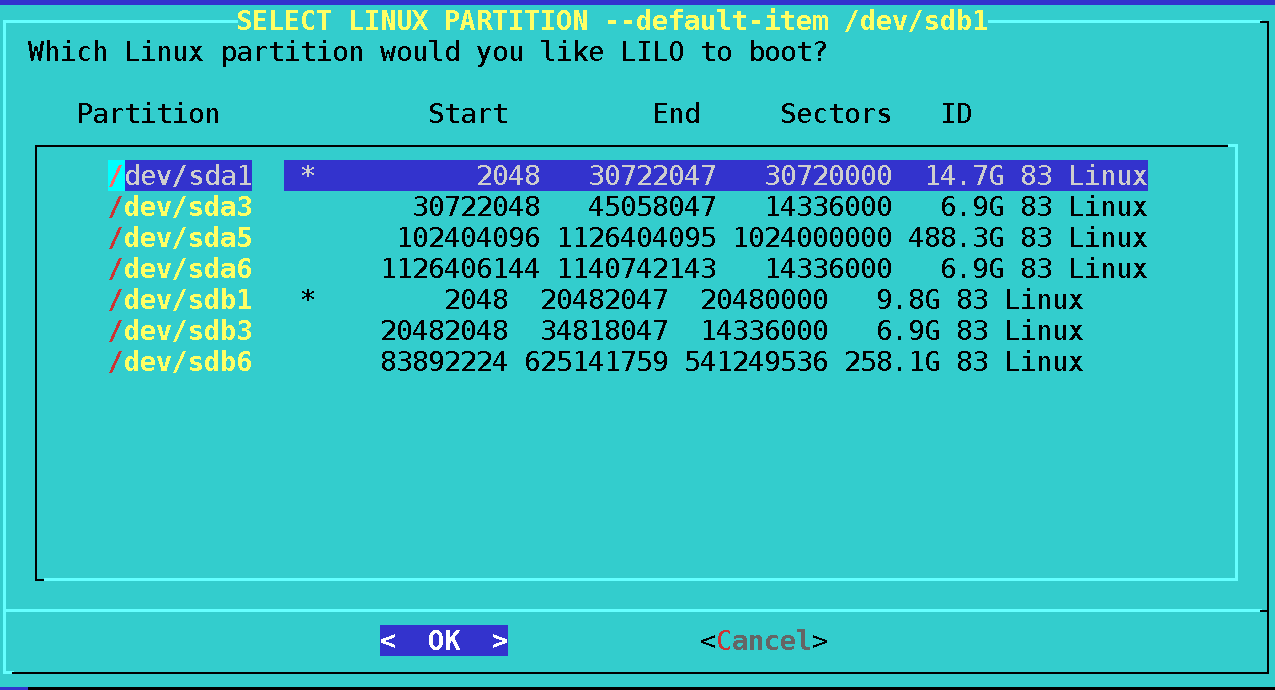
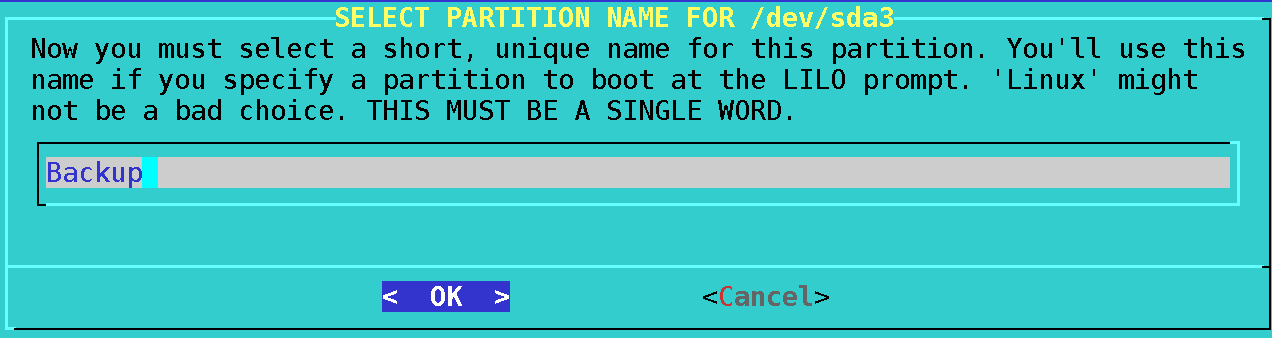
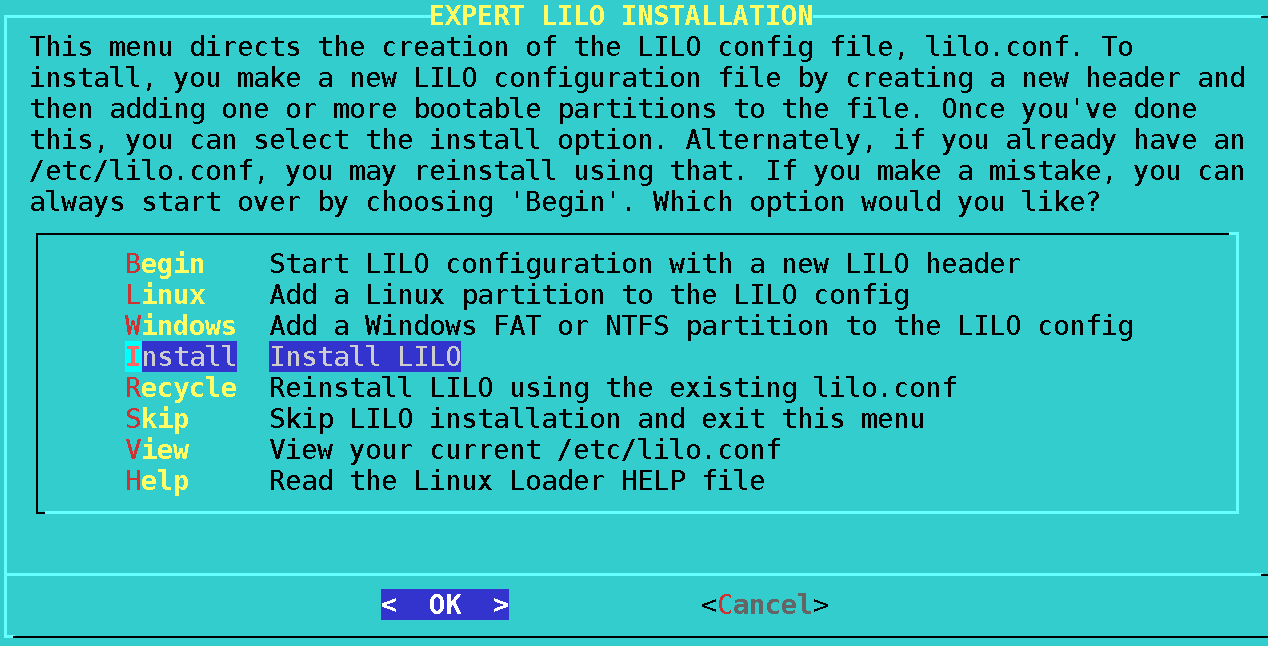
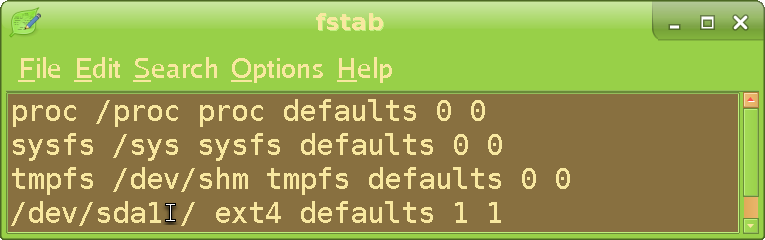
<feed xmlns="http://www.w3.org/2005/Atom" xmlns:xhtml="http://www.w3.org/1999/xhtml" xml:lang="en"><generator uri="https://git.xmpp-it.net/sch/Focus" version="1.4">The Focus</generator><link rel="banner" type="image/png">https://digdeeper.love/images/button.png</link><logo>https://digdeeper.love/images/logo_animated.gif</logo><rights>DigDeeper</rights><icon>/favicon.ico</icon><title>Backing up and restoring operating systems</title>Backing up and restoring operating systems- Introduction -- Backing up your OS -- Restoring your backup -- Making your backups bootable -- Booting OSes with other kernels -- Summary -IntroductionHave you ever lost your OS install due to breaking it and being unable to fix?Have you ever lost your OS install due to drive failure?Have you ever lost your OS install due to a theft or a fire?Have you ever wanted to copy your OS install to another computer without reinstalling it and redoing all the modifications to the base distro?Well, hopefully you haven't suffered from the first three. But if you have, you know the value of backups. And if you haven't, well, let me tell you that you don't want those things to happen. As for the fourth - if you are anything like me, you probably have your favorite, carefully prepared system configuration that you don't stray away from (except to check stuff out sometimes, maybe). Wouldn't it be great if you could just "freeze" and "teleport" your OS whenever and wherever you want to? Protecting you both from those listed hazards and saving time / effort redoing modifications in case you want to deploy your OS elsewhere. This article will teach you those magic spells. What we will do here is make a snapshot of your current running OS and store it on other partitions and / or drives - and then learn how to bring it back. The main reason for doing this is to immunize you against OS breaks; you can always play around with your current install and just restore the backup in case of a break. Anyway let's go:Backing up your OSLog in to another Linux installation (on the same computer). This might be an OS that's already installed on another partition / drive, or even a live USB disk.Launch GPartedRight click and copy the partition that has the system you want to backup (it is easier to do this entire process if your /home is on the same partition - in that case, all your settings will be backed up, as well. But not strictly essential):Find an amount of unallocated space that is higher than the size of your copied partition (if you don't have, you are going to need to shrink and / or delete partitions), right click and paste:Proceed with the operation:Wait until it finishes, and close:Now, shrink that copied partition (not the actual one!) to the minimum possible space. Though, you will need a little more than what GParted says is the minimum - so if you have a 7GB system, try 9GB just to be safe (if there's too little, it will result in the New size smaller than the minimum error):Apply and confirm the operation as in step 5. What the shrinking accomplishes is that your OS backup will fit into less space later (e.g a smaller pendrive). If you want to use the dd command to restore it later, it will also take much less time, then.Copy the newly made partition as in step 3 (except a different identifier this time - sda6 in our screenshots).We will make yet another backup - this time on another drive. This way - if your first drive dies and takes with it your backup - you still have another. Switch your drive (you do have more than one, right?):Paste the partition in unallocated space again (just on the other drive):Apply and confirm as usual. Now attach a pendrive and refresh devices:A new device will appear. Switch to it (this will be the one with the "furthest" letter in the alphabet):Copy and paste your OS again, this time onto the pendrive:Apply and confirm as usual. Now, you can stick that pendrive backup onto a relative or a friend in case of a fire or theft in your house. Remember to label your backups, so that it is easier to recognize them:Do that for all of the backups.Restoring your backupTo restore a backup, we will redo the entire process but in reverse. So copy the backup:Switch your drive to whichever you want to restore the backup to. Paste to unallocated space:Apply and confirm as usual. Here is our restored backup:We're going to need to enlarge it now (since presumably, you will still install stuff on it after that). Click Resize/Move and input your desired size:Making your backups bootableUPDATE February 2025: the Lilo included by default in Slackware 15 might not work for this, and you might need to downgrade (or rather upgrade in this case) to the one from 14.2 for example. A few weeks ago I tried to setup a few bootable OSes in my drive(s), but whatever I did with the configs, drive positions, etc. was failing - Lilo could still only boot from /dev/sda1 regardless. I thought it might have been because of some modifications I've done to my usual OS, so I tried installing Lilo from a pure Slackware 15, which did nothing either. At the final sign of desperation I thought to try the last remaining option, which was to use another version of Lilo - even though the Internet had nothing about a "bug" in the new version. And voila! It fixed the problem. I never noticed it earlier because I was almost always booting /dev/sda1; and even when I was trying another option and it failed, I just assumed I had setup Lilo incorrectly and didn't think too much of it. But no; there is probably some combination of old hardware (like my junkyard one) that activates this "bug" in Lilo. Keep this in mind before you read the following part of the tutorial.To boot your backups, you're going to have to inform your bootloader about them. Run sudo liloconfig and pick the expert mode. Note: this entire process will assume you're using a live system that runs the same kernel as your restored backups; if it's not the case, the following instructions are still valid, but will need a tiny modification after you're done.Now pick Begin:The next screen should not be needed, so just OK past it:Just pick standard on the next screen:Pick MBR now:Going to assume you've picked the first drive, but you can change this to /dev/sdb or any other drive you want to install the bootloader to:Pick 30 seconds here, so that you can actually manage to choose which OS you want to boot (main or backup):If using Salix, you will get to choose if you want its logo to display on boot. Just deny it (or allow if you like, whatever):Now add a bootable system:First, add the main system (sda1 - which was the origin of all our backups and that you are presumably using regularly):Input a name that will remind you of it and OK past the screen:Add another linux system, this time the backup. Pick Linux again, and add the sda3 partition on which the backup is installed:Input the appropriate name:Finally install the bootloader:Now you will be able to choose between booting your main system and your restored backup if you choose the first drive at the BIOS level (you could have theoretically put as many OSes in there as you wanted to, even ones installed on other drives; we're going to keep it simple for now, though). Before the backup is operational - we're going to have to point its fstab partitions towards the correct identifiers. Type sudo mount /dev/sda3 /mnt/tmp in a terminal. Then sudo leafpad /mnt/tmp/etc/fstab:The fstab file decides from which partition the system is actually booted (and every other partition that will be mounted at launch). See how it's still trying to boot from sda1, even though the backup is on sda3? That's because the original fstab had sda1 in it - as it should have. But now we're trying to run the restored backup, so this is counterproductive. Just change it to sda3 and save.Booting OSes with other kernelsAdding a Linux distro in liloconfig's interactive menu will insert an entry pointing the bootloader to the same kernel that the OS you ran liloconfig from has. For example, the lilo config file might have a section like this:# Linux bootable partition config begins
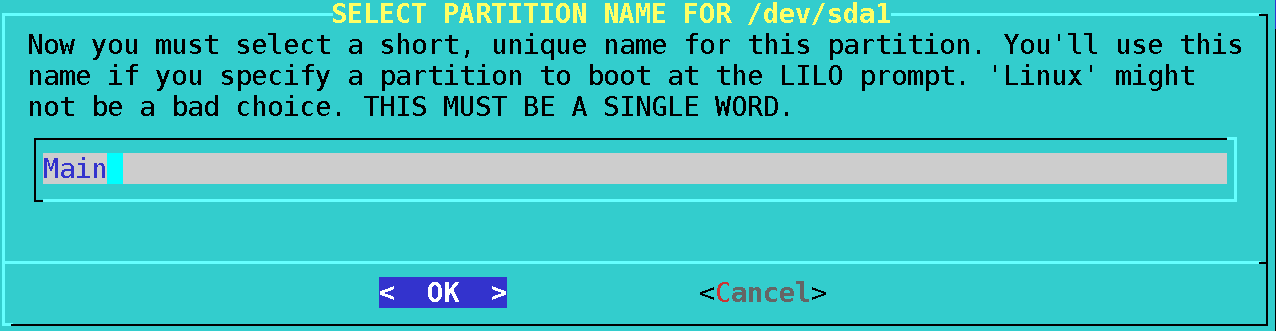
image = /boot/vmlinuz-generic
  initrd = /boot/initrd.gz
  root = /dev/sdb1
  label = Slack14
  read-only  # Partitions should be mounted read-only for checking
# Linux bootable partition config endsIn Slackware, vmlinuz-generic is actually just a symlink to whatever the kernel version it's using, eg. vmlinuz-generic-5.15.63 in 15. If the OS you ran liloconfig from has that, then lilo will "expect" all the OSes defined in the config file to be using it too. Yet, imagine that you wanted lilo to boot an older or newer Slackware version (like the 14 in the above example), or even a completely different distro. The bootloader will expect the booted OS to be using the kernel specified in the config file, but it doesn't, so it will fail to load. To fix this problem, you will need to copy the kernel from the other distro to your current /boot folder, and point lilo to it. First, mount the partition that contains the "other" distro you want to boot (eg sudo mount /dev/sdb1 /mnt/tmp), and copy its kernel to /boot (where liloconfig loads them from by default), eg sudo cp /mnt/tmp/boot/vmlinuz-generic-4.16.9 /boot; remember to pick the one with the numbers at the end. Now modify the lilo config file entry as such:# Linux bootable partition config begins
image = /boot/vmlinuz-generic-4.16.9
  initrd = /boot/initrd.gz
  root = /dev/sdb1
  label = Slack14
  read-only  # Partitions should be mounted read-only for checking
# Linux bootable partition config endsWhat was just vmlinuz-generic became vmlinuz-generic + the kernel version your "different" OS is using. Save and re-run lilo so that it "absorbs" the updated config file (just sudo lilo is enough). There is no problem for lilo be able to load many different Slackware version installs, or even different distros, though I have no experience with the latter. Some internet posters are saying that certain distros also have their own unique initrd files; if so, those will have to be copied to /boot and inserted into the config file, as well.SummaryThat's it! We've restored a backup. You can reboot in peace now. Even though there seem to be a lot of steps, this is actually easier than it seems if you become familiar with it. I use it every time I break shit and it's surely a lot easier than reinstalling a distro and redoing your changes (ugh). TBD: dd command backups.
Back to the front page<entry><author><email>digdeeper@disroot.org</email><name>DigDeeper</name><uri>xmpp:diggy@digdeeper.love</uri></author><content xmlns="http://www.w3.org/1999/xhtml" type="xhtml"><div class="subsection"><h3 id="backup">Backing up your OS</h3><ol><li><span class="list">Log in to another Linux installation (on the same computer). This might be an OS that's already installed on another partition / drive, or even a live USB disk.</span></li><li><span class="list">Launch GParted</span></li><li><span class="list">Right click and copy the partition that has the system you want to backup (it is easier to do this entire process if your /home is on the same partition - in that case, all your settings will be backed up, as well. But not strictly essential):</span></li><img class="center" width="885" height="535" src="/images/gparted_copy.png" alt="Copying a partition in GParted"/><li><span class="list">Find an amount of unallocated space that is higher than the size of your copied partition (if you don't have, you are going to need to shrink and / or delete partitions), right click and paste:</span></li><img class="center" width="885" height="535" src="/images/gparted_paste.png" alt="Pasting a partition in GParted"/><img class="center" src="/images/gparted_paste2.png" alt="Pasting a partition in GParted"/><li><span class="list">Proceed with the operation:</span></li><img class="center" width="438" height="70" src="/images/gparted_apply.png" alt="Applying an operation in GParted"/><img class="center" width="619" height="187" src="/images/gparted_confirm.png" alt="Confirming an operation in GParted"/><li><span class="list">Wait until it finishes, and close:</span></li><img class="center" width="736" height="491" src="/images/gparted_close.png" alt="Closing operations in GParted"/><li><span class="list">Now, shrink that copied partition (<strong>not the actual one!</strong>) to the minimum possible space. Though, you will need a little more than what GParted says is the minimum - so if you have a 7GB system, try 9GB just to be safe (if there's too little, it will result in the <q>New size smaller than the minimum</q> error):</span></li><img class="center" width="885" height="535" src="/images/gparted_resize.png" alt="Shrinking a partition in GParted"/><img class="center" width="576" height="356" src="/images/gparted_resize2.png" alt="Shrinking a partition in GParted"/><li><span class="list">Apply and confirm the operation as in step 5. What the shrinking accomplishes is that your OS backup will fit into less space later (e.g a smaller pendrive). If you want to use the <em>dd</em> command to restore it later, it will also take much less time, then.</span></li><li><span class="list">Copy the newly made partition as in step 3 (except a different identifier this time - <em>sda6</em> in our screenshots).</span></li><li><span class="list">We will make yet another backup - this time on another drive. This way - if your first drive dies and takes with it your backup - you still have another. Switch your drive (you <strong>do</strong> have more than one, right?):</span></li><img class="center" width="880" height="170" src="/images/gparted_switch.png" alt="Switching a drive in GParted"/><li><span class="list">Paste the partition in unallocated space again (just on the other drive):</span></li><img class="center" width="885" height="535" src="/images/gparted_paste3.png" alt="Pasting a partition in GParted"/><li><span class="list">Apply and confirm as usual. Now attach a pendrive and refresh devices:</span></li><img class="center" width="310" height="165" src="/images/gparted_refresh.png" alt="Refreshing devices in GParted"/><li><span class="list">A new device will appear. Switch to it (this will be the one with the "furthest" letter in the alphabet):</span></li><img class="center" width="885" height="535" src="/images/gparted_switch2.png" alt="Switching a drive in GParted"/><li><span class="list">Copy and paste your OS again, this time onto the pendrive:</span></li><img class="center" width="885" height="535" src="/images/gparted_paste4.png" alt="Pasting a partition in GParted"/><li><span class="list">Apply and confirm as usual. Now, you can stick that pendrive backup onto a relative or a friend in case of a fire or theft in your house. Remember to label your backups, so that it is easier to recognize them:</span></li><img class="center" width="885" height="535" src="/images/gparted_label.png" alt="Labeling a backup in GParted"/><img class="center" width="312" height="115" src="/images/gparted_label2.png" alt="Labeling a backup in GParted"/><li><span class="list">Do that for all of the backups.</span></li></ol></div></content><id>backup</id><link rel="enclosure" href="/images/gparted_copy.png" title="Copying a partition in GParted" type="image/png"/><link rel="enclosure" href="/images/gparted_paste.png" title="Pasting a partition in GParted" type="image/png"/><link rel="enclosure" href="/images/gparted_paste2.png" title="Pasting a partition in GParted" type="image/png"/><link rel="enclosure" href="/images/gparted_apply.png" title="Applying an operation in GParted" type="image/png"/><link rel="enclosure" href="/images/gparted_confirm.png" title="Confirming an operation in GParted" type="image/png"/><link rel="enclosure" href="/images/gparted_close.png" title="Closing operations in GParted" type="image/png"/><link rel="enclosure" href="/images/gparted_resize.png" title="Shrinking a partition in GParted" type="image/png"/><link rel="enclosure" href="/images/gparted_resize2.png" title="Shrinking a partition in GParted" type="image/png"/><link rel="enclosure" href="/images/gparted_switch.png" title="Switching a drive in GParted" type="image/png"/><link rel="enclosure" href="/images/gparted_paste3.png" title="Pasting a partition in GParted" type="image/png"/><link rel="enclosure" href="/images/gparted_refresh.png" title="Refreshing devices in GParted" type="image/png"/><link rel="enclosure" href="/images/gparted_switch2.png" title="Switching a drive in GParted" type="image/png"/><link rel="enclosure" href="/images/gparted_paste4.png" title="Pasting a partition in GParted" type="image/png"/><link rel="enclosure" href="/images/gparted_label.png" title="Labeling a backup in GParted" type="image/png"/><link rel="enclosure" href="/images/gparted_label2.png" title="Labeling a backup in GParted" type="image/png"/><summary type="html">&lt;i&gt;Section: Introduction&lt;/i&gt;&lt;hr/&gt;Context: </summary><title>Backing up your OS</title></entry><entry><author><email>digdeeper@disroot.org</email><name>DigDeeper</name><uri>xmpp:diggy@digdeeper.love</uri></author><content xmlns="http://www.w3.org/1999/xhtml" type="xhtml"><div class="subsection"><h3 id="restore">Restoring your backup</h3><ol><li><span class="list">To restore a backup, we will redo the entire process but in reverse. So copy the backup:</span></li><img class="center" width="885" height="535" src="/images/gparted_restore_copy.png" alt="Copying a partition in GParted"/><li><span class="list">Switch your drive to whichever you want to restore the backup to. Paste to unallocated space:</span></li><img class="center" width="885" height="535" src="/images/gparted_restore_paste.png" alt="Pasting a partition in GParted"/><li><span class="list">Apply and confirm as usual. Here is our restored backup:</span></li><img class="center" width="874" height="102" src="/images/gparted_restored.png" alt="Showing a restored backup in GParted"/><li><span class="list">We're going to need to enlarge it now (since presumably, you will still install stuff on it after that). Click <q>Resize/Move</q> and input your desired size:</span></li></ol><img class="center" width="566" height="356" src="/images/gparted_restore_resize.png" alt="Enlarging a partition in GParted"/></div></content><id>restore</id><link rel="enclosure" href="/images/gparted_restore_copy.png" title="Copying a partition in GParted" type="image/png"/><link rel="enclosure" href="/images/gparted_restore_paste.png" title="Pasting a partition in GParted" type="image/png"/><link rel="enclosure" href="/images/gparted_restored.png" title="Showing a restored backup in GParted" type="image/png"/><link rel="enclosure" href="/images/gparted_restore_resize.png" title="Enlarging a partition in GParted" type="image/png"/><summary type="html">&lt;i&gt;Section: Introduction&lt;/i&gt;&lt;hr/&gt;Context: </summary><title>Restoring your backup</title></entry><entry><author><email>digdeeper@disroot.org</email><name>DigDeeper</name><uri>xmpp:diggy@digdeeper.love</uri></author><content xmlns="http://www.w3.org/1999/xhtml" type="xhtml"><div class="subsection"><h3 id="boot">Making your backups bootable</h3><p><strong>UPDATE February 2025</strong>: <strong>the Lilo included by default in Slackware 15 might not work for this, and you might need to downgrade</strong> (or rather upgrade in this case) to the one from 14.2 for example. A few weeks ago I tried to setup a few bootable OSes in my drive(s), but whatever I did with the configs, drive positions, etc. was failing - Lilo could still only boot from /dev/sda1 regardless. I thought it might have been because of some modifications I've done to my usual OS, so I tried installing Lilo from a pure Slackware 15, which did nothing either. At the final sign of desperation I thought to try the last remaining option, which was to use another version of Lilo - even though the Internet had nothing about a "bug" in the new version. And voila! It fixed the problem. I never noticed it earlier because I was almost always booting /dev/sda1; and even when I was trying another option and it failed, I just assumed I had setup Lilo incorrectly and didn't think too much of it. But no; there is probably some combination of old hardware (like my junkyard one) that activates this "bug" in Lilo. Keep this in mind before you read the following part of the tutorial.</p><ol><li><span class="list">To boot your backups, you're going to have to inform your bootloader about them. Run <q>sudo liloconfig</q> and pick the <q>expert</q> mode. Note: this entire process will assume you're using a live system that runs the same kernel as your restored backups; if it's not the case, the following instructions are still valid, but will need a <a href="#otherkernels">tiny modification</a> after you're done.</span></li><img class="center" width="1276" height="549" src="/images/liloconfig.png" alt="Showing a terminal emulator with liloconfig running"/><li><span class="list">Now pick <q>Begin</q>:</span></li><img class="center" width="1267" height="641" src="/images/liloconfig_begin.png" alt="Beginning the liloconfig setup"/><li><span class="list">The next screen should not be needed, so just <q>OK</q> past it:</span></li><img class="center" width="1273" height="423" src="/images/liloconfig_kernel.png" alt="A useless screen in liloconfig"/><li><span class="list">Just pick <q>standard</q> on the next screen:</span></li><img class="center" width="1193" height="606" src="/images/liloconfig_looks.png" alt="Choosing how lilo will look like at boot"/><li><span class="list">Pick <q>MBR</q> now:</span></li><img class="center" width="1263" height="447" src="/images/liloconfig_mbr.png" alt="Picking MBR option to install the bootloader to"/><li><span class="list">Going to assume you've picked the first drive, but you can change this to <em>/dev/sdb</em> or any other drive you want to install the bootloader to:</span></li><img class="center" width="1268" height="333" src="/images/liloconfig_drive.png" alt="Liloconfig drive install choice screen, with sda input"/><li><span class="list">Pick <q>30 seconds</q> here, so that you can actually manage to choose which OS you want to boot (main or backup):</span></li><img class="center" width="1276" height="398" src="/images/liloconfig_time.png" alt="Liloconfig duration choice screen, with 30 seconds chosen"/><li><span class="list">If using Salix, you will get to choose if you want its logo to display on boot. Just deny it (or allow if you like, whatever):</span></li><img class="center" width="1270" height="209" src="/images/liloconfig_image.png" alt="Liloconfig image choice screen"/><li><span class="list">Now add a bootable system:</span></li><img class="center" width="1276" height="638" src="/images/liloconfig_add_system.png" alt="Adding a system in lilo"/><li><span class="list">First, add the main system (<em>sda1</em> - which was the origin of all our backups and that you are presumably using regularly):</span></li><img class="center" width="1275" height="690" src="/images/liloconfig_system_choice.png" alt="Picking a system for the bootloader to recognize"/><li><span class="list">Input a name that will remind you of it and <q>OK</q> past the screen:</span></li><img class="center" width="1276" height="336" src="/images/liloconfig_name_screen.png" alt="Showing the system name input screen in liloconfig"/><li><span class="list">Add another linux system, this time the backup. Pick <q>Linux</q> again, and add the <em>sda3</em> partition on which the backup is installed:</span></li><img class="center" width="1277" height="671" src="/images/liloconfig_backup.png" alt="Adding the restored backup as a bootable system in liloconfig"/><li><span class="list">Input the appropriate name:</span></li><img class="center" width="1272" height="338" src="/images/liloconfig_name_screen2.png" alt="Showing the system name input screen in liloconfig"/><li><span class="list">Finally install the bootloader:</span></li><img class="center" width="1268" height="646" src="/images/liloconfig_install.png" alt="Finally installing the bootloader"/><img class="center" width="630" height="150" src="/images/lilo_installed.png" alt="Lilo finally installed"/><li><span class="list">Now you will be able to choose between booting your main system and your restored backup if you choose the first drive at the BIOS level (you could have theoretically put as many OSes in there as you wanted to, even ones installed on other drives; we're going to keep it simple for now, though). Before the backup is operational - we're going to have to point its fstab partitions towards the correct identifiers. Type <q>sudo mount /dev/sda3 /mnt/tmp</q> in a terminal. Then <q>sudo leafpad /mnt/tmp/etc/fstab</q>:</span></li><img class="center" width="765" height="240" src="/images/fstab.png" alt="Showing the fstab file from the restored backup"/><p>The fstab file decides from which partition the system is actually booted (and every other partition that will be mounted at launch). See how it's still trying to boot from <em>sda1</em>, even though the backup is on <em>sda3</em>? That's because the original fstab had sda1 in it - as it should have. But now we're trying to run the restored backup, so this is counterproductive. Just change it to <q>sda3</q> and save.</p></ol></div></content><id>boot</id><link rel="enclosure" href="/images/liloconfig.png" title="Showing a terminal emulator with liloconfig running" type="image/png"/><link rel="enclosure" href="/images/liloconfig_begin.png" title="Beginning the liloconfig setup" type="image/png"/><link rel="enclosure" href="/images/liloconfig_kernel.png" title="A useless screen in liloconfig" type="image/png"/><link rel="enclosure" href="/images/liloconfig_looks.png" title="Choosing how lilo will look like at boot" type="image/png"/><link rel="enclosure" href="/images/liloconfig_mbr.png" title="Picking MBR option to install the bootloader to" type="image/png"/><link rel="enclosure" href="/images/liloconfig_drive.png" title="Liloconfig drive install choice screen, with sda input" type="image/png"/><link rel="enclosure" href="/images/liloconfig_time.png" title="Liloconfig duration choice screen, with 30 seconds chosen" type="image/png"/><link rel="enclosure" href="/images/liloconfig_image.png" title="Liloconfig image choice screen" type="image/png"/><link rel="enclosure" href="/images/liloconfig_add_system.png" title="Adding a system in lilo" type="image/png"/><link rel="enclosure" href="/images/liloconfig_system_choice.png" title="Picking a system for the bootloader to recognize" type="image/png"/><link rel="enclosure" href="/images/liloconfig_name_screen.png" title="Showing the system name input screen in liloconfig" type="image/png"/><link rel="enclosure" href="/images/liloconfig_backup.png" title="Adding the restored backup as a bootable system in liloconfig" type="image/png"/><link rel="enclosure" href="/images/liloconfig_name_screen2.png" title="Showing the system name input screen in liloconfig" type="image/png"/><link rel="enclosure" href="/images/liloconfig_install.png" title="Finally installing the bootloader" type="image/png"/><link rel="enclosure" href="/images/lilo_installed.png" title="Lilo finally installed" type="image/png"/><link rel="enclosure" href="/images/fstab.png" title="Showing the fstab file from the restored backup" type="image/png"/><link rel="related" href="#otherkernels" title="tiny modification"/><summary type="html">&lt;i&gt;Section: Introduction&lt;/i&gt;&lt;hr/&gt;Context: UPDATE February 2025: the Lilo included by default in Slackware 15 might not work for this, and you might need to downgrade (or rather upgrade in this case) to the one from 14.2 for example. A few weeks ago I tried to setup a few bootable OSes in my drive(s), but whatever I did with the configs, drive positions, etc. was failing - Lilo could still only boot from /dev/sda1 regardless. I thought it might have been because of some modifications I've done to my usual OS, so I tried installing Lilo from a pure Slackware 15, which did nothing either. At the final sign of desperation I thought to try the last remaining option, which was to use another version of Lilo - even though the Internet had nothing about a "bug" in the new version. And voila! It fixed the problem. I never noticed it earlier because I was almost always booting /dev/sda1; and even when I was trying another option and it failed, I just assumed I had setup Lilo incorrectly and didn't think too much of it. But no; there is probably some combination of old hardware (like my junkyard one) that activates this "bug" in Lilo. Keep this in mind before you read the following part of the tutorial.</summary><title>Making your backups bootable</title></entry><entry><author><email>digdeeper@disroot.org</email><name>DigDeeper</name><uri>xmpp:diggy@digdeeper.love</uri></author><content xmlns="http://www.w3.org/1999/xhtml" type="xhtml"><div class="subsection"><h3 id="otherkernels">Booting OSes with other kernels</h3><p>Adding a Linux distro in liloconfig's interactive menu will insert an entry pointing the bootloader to the same kernel that the OS you ran liloconfig from has. For example, the lilo config file might have a section like this:</p><blockquote># Linux bootable partition config begins<br/>
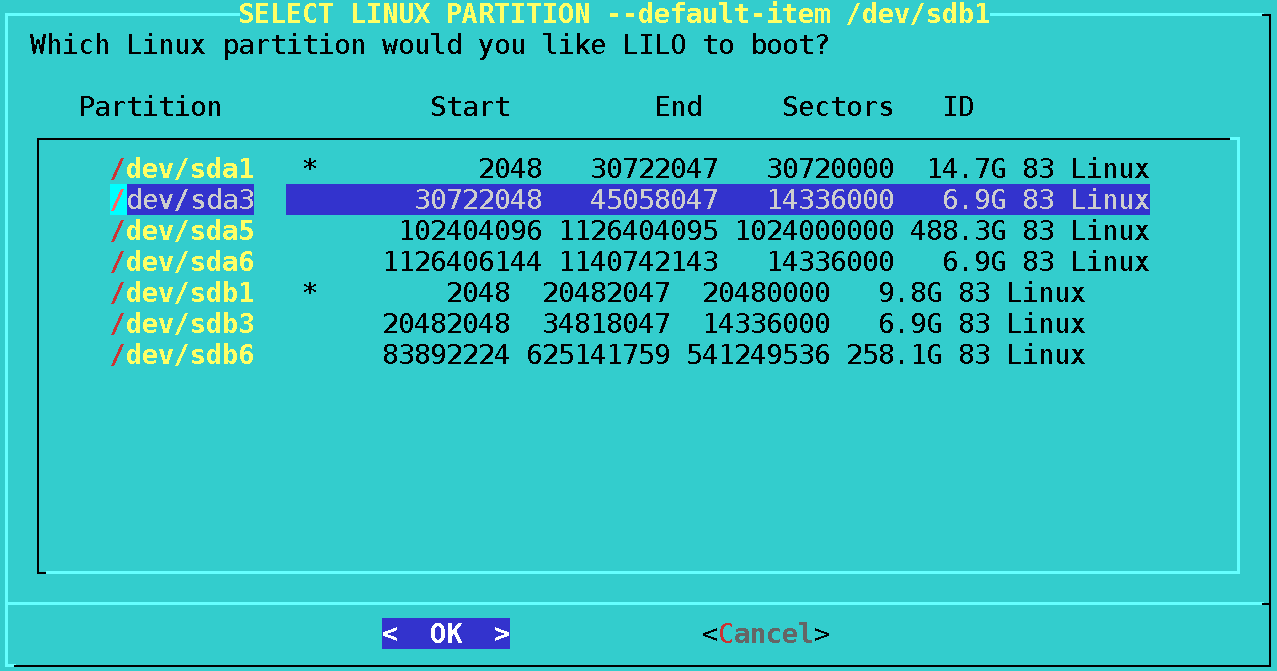
image = /boot/vmlinuz-generic<br/>
  initrd = /boot/initrd.gz<br/>
  root = /dev/sdb1<br/>
  label = Slack14<br/>
  read-only  # Partitions should be mounted read-only for checking<br/>
# Linux bootable partition config ends</blockquote><p>In Slackware, <em>vmlinuz-generic</em> is actually just a symlink to whatever the kernel version it's using, eg. <em>vmlinuz-generic-5.15.63</em> in 15. If the OS you ran liloconfig from has that, then lilo will "expect" all the OSes defined in the config file to be using it too. Yet, imagine that you wanted lilo to boot an older or newer Slackware version (like the 14 in the above example), or even a completely different distro. The bootloader will expect the booted OS to be using the kernel specified in the config file, but it doesn't, so it will fail to load. To fix this problem, you will need to <strong>copy the kernel from the other distro to your current /boot folder, and point lilo to it</strong>. First, mount the partition that contains the "other" distro you want to boot (eg <q>sudo mount /dev/sdb1 /mnt/tmp</q>), and copy its kernel to <em>/boot</em> (where liloconfig loads them from by default), eg <q>sudo cp /mnt/tmp/boot/vmlinuz-generic-4.16.9 /boot</q>; remember to pick the one with the numbers at the end. Now modify the lilo config file entry as such:</p><blockquote># Linux bootable partition config begins<br/>
image = /boot/vmlinuz-generic-4.16.9<br/>
  initrd = /boot/initrd.gz<br/>
  root = /dev/sdb1<br/>
  label = Slack14<br/>
  read-only  # Partitions should be mounted read-only for checking<br/>
# Linux bootable partition config ends</blockquote><p>What was just <em>vmlinuz-generic</em> became <em>vmlinuz-generic</em> + the kernel version your "different" OS is using. Save and re-run lilo so that it "absorbs" the updated config file (just <q>sudo lilo</q> is enough). There is no problem for lilo be able to load many different Slackware version installs, or even different distros, though I have no experience with the latter. Some internet posters are saying that certain distros also have their own unique initrd files; if so, those will have to be copied to <em>/boot</em> and inserted into the config file, as well.</p></div></content><id>otherkernels</id><summary type="html">&lt;i&gt;Section: Introduction&lt;/i&gt;&lt;hr/&gt;Context: Adding a Linux distro in liloconfig's interactive menu will insert an entry pointing the bootloader to the same kernel that the OS you ran liloconfig from has. For example, the lilo config file might have a section like this:# Linux bootable partition config begins
image = /boot/vmlinuz-generic
  initrd = /boot/initrd.gz
  root = /dev/sdb1
  label = Slack14
  read-only  # Partitions should be mounted read-only for checking
# Linux bootable partition config ends</summary><title>Booting OSes with other kernels</title></entry><entry><author><email>digdeeper@disroot.org</email><name>DigDeeper</name><uri>xmpp:diggy@digdeeper.love</uri></author><content xmlns="http://www.w3.org/1999/xhtml" type="xhtml"><div class="subsection"><h3 id="summary">Summary</h3><p>That's it! We've restored a backup. You can reboot in peace now. Even though there seem to be a lot of steps, this is actually easier than it seems if you become familiar with it. I use it every time I break shit and it's surely a lot easier than reinstalling a distro and redoing your changes (ugh). TBD: dd command backups.
</p></div></content><id>summary</id><summary type="html">&lt;i&gt;Section: Introduction&lt;/i&gt;&lt;hr/&gt;Context: That's it! We've restored a backup. You can reboot in peace now. Even though there seem to be a lot of steps, this is actually easier than it seems if you become familiar with it. I use it every time I break shit and it's surely a lot easier than reinstalling a distro and redoing your changes (ugh). TBD: dd command backups.
</summary><title>Summary</title></entry></feed>