<?xml version="1.0" encoding="UTF-8"?>
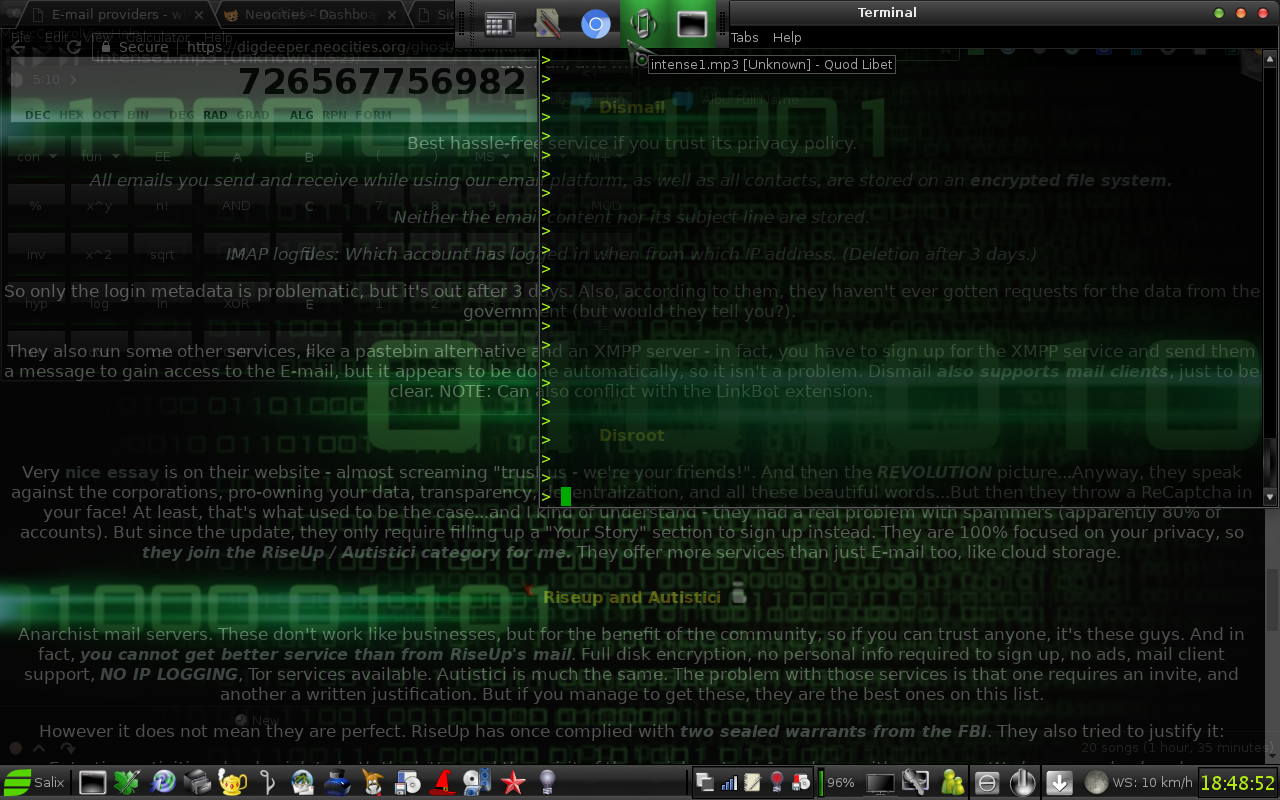
<feed xmlns="http://www.w3.org/2005/Atom" xmlns:xhtml="http://www.w3.org/1999/xhtml" xml:lang="en"><generator uri="https://git.xmpp-it.net/sch/Focus" version="1.4">The Focus</generator><link rel="banner" type="image/png">https://digdeeper.love/images/button.png</link><logo>https://digdeeper.love/images/logo_animated.gif</logo><rights>DigDeeper</rights><icon>/favicon.ico</icon><title>Linux Tips and Tricks</title>Linux Tips and Tricks- Introduction -- Manual Wifi configuration -- Application-related -- Adding repositories -- Installing and removing packages -- Packages from other distros -- Adding commonly used applications to the panel -- Making it look good -- Themes -- Other settings you can change -- Set up everyday software -- Web browser -- Text Editor / IDE -- File manager -- Life savers / enhancers -- Terminal aliases -- Hardinfo -- Data recovery -- Deploying your system elsewhere -- Using ddcutil to control your monitor -- Other things to keep in mind -IntroductionThe more accurate title would be the things I do after installing a Linux system to make my experience more comfortable. Even with such a user-friendly distro as Salix (which this guide will assume - but most of it can be adapted to other distros), it is easy to get overwhelmed, especially for a recent Windows refugee. So, hopefully this article will provide some direction and save you time, effort, and possible frustration for when you break something and / or have to install Linux on another machine.Manual Wifi configurationPutting this in first since Internet access is required for much of the guide. Since NetworkManager is a famously terrible piece of junk and the Slackware scripts don't always pick the network up, here's how you can do it on your own (WIP):Type iwconfig or ifconfig to see the name of your interface (say, wlan0).Type sudo iwlist wlan0 scan to see the Wifi networks found. Take note of the one you want to connect to.Type sudo wpa_passphrase my_beautiful_network amazingly_strong_password, filling in the necessary values. Copy the output.Type sudo leafpad /etc/wpa_supplicant.conf. Paste the output and save.Type sudo leafpad /etc/rc.d/rc.inet1.conf. Add this at the end (of course, if you already have another network with the number 4, use a higher number):IFNAME[4]= "wlan0"
IPADDR[4]= ""
NETMASK[4]= ""
USE_DHCP[4]= "yes"
DHCP_HOSTNAME[4]= "my_beautiful_network"
WLAN_WPA[4]= "wpa_supplicant"
WLAN_WPADRIVER[4]= "wext"The Slackware scripts should pick it up on reboot now. To test it out, type sudo sh /etc/rc.d/rc.inet1 wlan0_restart. You can debug the terminal output if it still refuses to work, or inspect /var/log/messages for even more information. Failing that, we can bypass the Slackware scripts and connect with wpa_supplicant directly by typing sudo wpa_supplicant -iwlan0 -c/etc/wpa_supplicant.conf&amp;. This should be foolproof, but in case it's not - the wpa_supplicant log resides in /var/log/wpa_supplicant.log. If you want to connect with wpa_supplicant at every boot (bypassing Slackware scripts), add these commands to /etc/rc.d/rc.local:sh /etc/rc.d/rc.inet1 wlan0_stop
wpa_supplicant -iwlan0 -c/etc/wpa_supplicant.conf&amp;
dhcpcd&amp;In case the network is still failing after reboot, the issue might be resolv.conf not being updated by dhcpcd. If that happens, type sudo resolvconf -l and copy the relevant nameservers. The name of the interface might not be the same as before (for example, I've had it become wlan.ra), so take that into account. Paste the output into /etc/resolv.conf, which should look something like this (of course, the IPs will be different):# resolv.conf from wlan0.ra
# Generated by dhcpcd from wlan0.ra
nameserver 55.55.55.55
nameserver 33.33.33.33Application-relatedAdding repositoriesNow, Salix repositories are quite large and should be enough to get you started, but someday you will need to branch out. The defaults are limited to packages from Slackware 14.2, while sometime you just might need a newer version (for example, certain python3 applications require 3.6 which Salix does not provide). Some packages are also not available at all, such as SpaceFM, my favorite file manager. In come the Slackel (http://www.slackel.gr/repo/x86_64/current/) and SlackOnly (https://packages.slackonly.com/pub/packages/14.2-x86_64/) repositories. Just start up Gslapt, go to Preferences - Sources, click Add, and copy those links. Remember, though, that you can easily break shit if you aren't careful - a repo can, for example, pull in a library that a package requires, and that one will replace the one you had before - breaking everything that was dependent on it. There are also other available repositories, such as Ponce or Alien - search around!Installing and removing packagesIt is hard for a distro to contain everything you need and nothing else - in fact, it is impossible (but Salix comes close). So you will always have to add and remove something. You can use the repositories you've added in the previous step - or, another nice way to install a particular package you need is to use SlakFinder (http://slakfinder.org/ - here are my search plugins for its easier usage). This website allows you to type a package name (even partial) and it will show you all the repositories you can download it from (including the links!). You will have to use the installpkg command to use those. This way will also not bring in any dependencies, which has its advantages (no breakage) and disadvantages (package might not work). Note: if you want to skip installing dependencies, you can use the Download packages only option in Gslapt - or find a repository that doesn't contain dependency information. I will assume you've managed to install everything you need without breaking anything (harder than it sounds sometimes). Slapt-get (what Gslapt uses) keeps all its installed packages in /var/slapt-get/, so I recommend copying those to a pendrive. This way, if you ever install Salix elsewhere, you can immediately bring it to your preferred state by running the command "sudo installpkg ./*" while inside the folder you've stored them in. And you won't even have to connect to the Internet anymore to download those packages.Packages from other distrosUnfortunately for us Slackware-based distribution users, Ubuntu / Debian are the primary target for many Linux developers. Therefore, many packages cannot be found in the Slackware .t*z format, but can in .deb or sometimes Red Hat's .rpm. What to do then? deb2tgz and rpm2tgz to the rescue. These scripts allow you to convert any .deb or .rpm package so that it is compatible with Slackware-based distros. deb2tgz is found in the SlackOnly repository, while rpm2tgz - in the Salix one.Add commonly-used applications to the panelBy default, Salix includes only a few generic icons on the panel - the terminal, text editor, file manager and web browser. But of course you will use so much more of them - so why not put the most used ones in there as well? Let's add a music player - right click the panel, hover over Panel, and click Add new items. Now choose Launcher and click Add. An empty icon will appear in there - right click it and choose "Properties". Now click the plus button. Type the name of your music player (for example QuodLibet) or find it in the list of applications, then click on it and use the Add option to put it in the panel. Close the launcher editor, right click the icon that appeared, and Move it to wherever it is convenient for you. You will probably install packages pretty often, so let's add Gslapt in there as well. Then the mail client, painting program, IDE, and movie player. You're all set! The result should look something like this: 

This should heavily boost your productivity - no more clicking around to find the program you're looking for. The panel settings (as well as other Xfce-related ones) are stored in /home/YourUsername/.config/xfce4/, so you can easily copy them to a pendrive or something. And if you break Linux on this machine, you can just reinstall it and keep the home partition, so the settings will be carried over.Making it look goodThemesLet's face it, Xfce's default look sucks. And all its default themes also suck. Now you can install the murrine engine and its associated themes, but they are only slightly better. Chances are, if you want to actually enjoy looking at your computer, you will need to peruse the website https://xfce-look.org/. But first, go to Settings &gt; Settings manager and let's see how the look of Xfce is actually decided. You can divide it into five parts:Theme (the color scheme of everything except the title bar - set through the Appearance menu)Icons (also Appearance menu)Wallpaper (in Desktop)Title bar (colour and buttons; in Window Manager menu)Cursors (in Mouse and Touchpad &gt; Theme).Now wouldn't it be nice to have all these put together, instead of scattered around? Download the package Xfce-theme-manager (find it through the aforementioned SlakFinder). Now a new section will appear in your Settings Manager. There you can modify all the settings as well as some additional ones - and save them as actual whole themes. Anyway, visit https://xfce-look.org/ and look around. First, time to dump the boring single-colored cursors. Let's have some fun - how about a fucking Katana as your cursor - download it by - you guessed it - clicking the Download btton. To install the cursor set, move the archive to /usr/share/icons, open it in Engrampa and extract the folder that is INSIDE - just extracting the archive will create a folder with its name, and the theme will not work. Some of my favorites are Charged, Dragon"s Jewel, and Dragon Claw. Keep in mind anyone could submit a theme, so there's bound to be a few low quality or even incomplete ones. Now do the same for Icon Themes and XFCE/XFWM4 Themes (extracted in /usr/share/themes) and you're all set! Note: while seeking themes, try to find ones that have GTK3 support instead of just GTK2; otherwise, the GTK3 programs will use the default look and seem out of place compared to the GTK2 ones (edit: or trash gtk3 altogether, then you can use all the gtk2-only themes). As for the wallpaper - well, you can get it from anywhere - any png/jpg image will work. Put them in /usr/share/xfce4/backdrops/ to have them displayed in the settings manager. It is also possible to edit a theme (or create your own, but that's way too much effort) - for that, go to your theme's folder, then gtk2.0 and open the gtkrc file in your favorite text editor. There's really no proper documentation for doing this, so you'll have to figure out what stuff means on your own.Other settings you can changeLots! Let's go through them one by one:Screensaver - you're a lucky guy; there are a lot of them by default! Even a fucking Pacman one. Find them in Settings &gt; Screensaver. Some fun ones are Kumppa, Fireworkx, or BinaryRing.Transparency - a common criticism of "ricing" is that you never see your wallpaper. Well, not if you have this enabled! Go to Window Manager Tweaks &gt; Compositor, enable it if it isn't already, and choose your preferred transparency levels for inactive and moving windows. I recommend making them mostly transparent. While we're here, turn on your Terminal emulator (if you're new to Linux - trust me, you will use this a lot) and change its transparency as well (Edit &gt; Preferences &gt; Appearance. Background &gt; Transparent).Screen resolution - self explanatory. It's in the Display section of the Settings Manager.The look during Alt+Tabbing - it's in Window Manager Tweaks &gt; Compositor, specifically the Show windows preview in place of icons when cycling.. I think this should be disabled, because it's fucking ugly.Font family and size - Appearance &gt; Fonts.Desktop icons - Desktop &gt; Icons. I recommend deleting them all, to see the wallpaper in all its glory.Terminal colors - Lime on black, hacker style ^_^Changing the look of specific icons - You can do that too. Right click on an application on the panel, Edit Launcher and click on its icon. By using the "Image files" option and combing through the folders in /usr/share/icons/, you can use icons from many different themes at the same time, or even your own custom ones.If you want to create a new panel, right click an existing one and navigate to Panel &gt; Panel Preferences, then click the + button. There you can choose its properties such as size or whether it will hide itself when the cursor is away. You can use it, for example, to display the currently active applications at the top while you hover over there. Okay, that's about as much as you can do with pure Xfce. The final result might look something like this:  There are some other tools for more heavy ricing that I might describe someday; for now though, let's move on to functionality.Set up everyday softwareWeb BrowserIf you're like me, you will be spending much of your computer time browsing the Internet. So why not prepare it for this - as we will see - gargantuan task now? First of all - the browser choice. Refer to my other article - How to choose a browser for your daily use? - for advice on this topic. Time to harden it with addons (if it supports them - but if you read the linked article, you will hopefully see how essential they are). Essential privacy (and other) addons. Now let's set up our search engines. Pale Moon will detect most of them when visited and you can add them then. To test it out, go to https://metager.de, press the small black arrow near the search bar, and then "Add Metager". Now you can select it from the dropdown list and it will become the default in the search bar. Another way to add them is finding a plugin from https://mycroftproject.com/ for the website you want to search through. After you've added all the ones you want, use the Manage Search Engines menu (black arrow again) to set keyboard shortcuts for them. This will allow you to use any search engine in the address bar by typing their shortcut (e.g ddg for DuckDuckGo) followed by the query - very convenient. If you've settled on a Chrome-based browser, it will detect whenever you use a search engine, and automatically add it to the settings menu. Go there and click "Manage search engines". There, you will have a list of all the ones you've ever used - so if you searched for something with SlakFinder, you can now set a keyword for it. Click on the three dots to the right of it, Edit, and put "sf" as the keyword. Now you can perform a SlakFinder search by typing sf your-search-term in the address bar. Pretty convenient, huh? Now do the same for StartPage (keyword sp) and DuckDuckGo (keyword ddg), as well as any others you want. Note: you should also configure a VPN and / or Tor for your web browsing. Refer to How and why to VPNize your entire traffic and Darknet setup in Slackware-based distros.Text Editor / IDEIf you are a developer, Geany is a great, lean tool to use and installed by default in Salix. What I like to do here is first to create some projects using the Project &gt; New option. With this, you will be able to switch through different projects with three clicks and have all their files loaded. Very useful if you - for example - both develop a website and create software. The nice thing about this is that you can search and replace a string in all loaded files (Ctrl+H -&gt; Replace all in session). Makes it much more convenient to do mass modifications. Another feature I like to use is templates - if you are going to be creating documents that look the same just with different content, templates are invaluable. Create a skeleton of your file with all the content removed and put it in /usr/share/geany/templates/files/. Then, anytime you want to make a new document you can do that in 3 clicks with File -&gt; New with template and then choose the template. Very convenient! Macros are another thing you should really try to learn (Tools -&gt; Edit macros) - these allow you to make more complex modifications to a document, but they can be kind of hard to use. Though with a little bit of effort they can automate lots of tedious work. Another thing to take note of are the navigation keyboard shortcuts (move to next word, delete current line, etc) which again streamline the development. UPDATE April 2025: newest Geany seems to have removed the underscore as a "word boundary" (basically any character that "stops" jumping between words with CTRL+left / right arrow). This was unacceptable to me as my images are all named like "my_awesome_image.png" and sometimes it's really necessary for me to quickly change the "awesome" to "horrible" or something like that. So I set out on the journey to figure this out and I did. Go to Tools - Configuration files -&gt; filetypes.common and find this section:#~ [settings]
#~ # which characters should be skipped when moving (or included when deleting) to word boundaries
#~ should always include space and tab (\s\t)
#~ whitespace_chars=\s\t!\"#$%&amp;'()*+,-./:;&lt;=&gt;?@[\\]^`{|}~
#~ wordchars=_abcdefghijklmnopqrstuvwxyzABCDEFGHIJKLMNOPQRSTUVWXYZ0123456789First, uncomment the first line, which enables the entire config section. Then, uncomment the whitespace and wordchars lines. As you can see, the last line contains the underscore, meaning it's going to be considered a "letter" by geany, and won't stop the "fast travel". Delete it. Then add an underscore to the previous line, which defines the characters that actually do stop the "fast travel". I like adding it to the end of the line. The final section will look like this:[settings]
#~ # which characters should be skipped when moving (or included when deleting) to word boundaries
#~ # should always include space and tab (\s\t)
whitespace_chars=\s\t!\"#$%&amp;'()*+,-./:;&lt;=&gt;?@[\\]^`{|}~_
wordchars=abcdefghijklmnopqrstuvwxyzABCDEFGHIJKLMNOPQRSTUVWXYZ0123456789After that, go to Tools and click Reload configuration. Everything should work properly after that.File managerAnother one you'll be spending some time on. This guide will assume you are using SpaceFM, since it is simply the most powerful one. What can it do?Create custom commands - see here.Set up key shortcuts - for like everything. Right click any item and then Key Shortcut.Create bookmarks - Navigate to a folder you want to add, then click Bookmarks -&gt; New Bookmark. Right click the bookmark that has appeared to set its icon or key shortcut.Set global mount options for devices - right click on a device, then Settings -&gt; Mount Options. If you want to do that for a specific device, use the Re/Mount option. Some useful ones are rw and sync especially for MP3 players (without sync, the files don't seem to be saved to the player at all, even if you sync manually).Modify the toolbar - right click it to see all the options. Can add bookmarks, commands, applications, move stuff around, remove buttons already there, etc.Lots and lots of others! SpaceFM's power is truly galactical - I don't even know half of it. Explore!Life savers / enhancersTerminal aliasesLet's face it - it can get tedious to type the same long terminal commands all the time. Aliases to the rescue! In your home directory, create a file named .bash_aliases - yes, with the dot - and put this line there: alias sli= "sudo slapt-get install". Since you will most likely be using slapt-get quite a bit, this will bind it to the shortcut sli. And you can do that for any command just by putting an alias in a new line. Keep in mind you have to log out to have the shortcuts be applied.HardinfoJust a program that shows you all the hardware you have - something that should really be there by default, but somehow isn't. Available in the default repos.Data recoveryIt is inevitable that you will lose some of your data sooner or later - whether through power, hardware, or system failure; accidentally (or on purpose - and then regretting it) deleting it, or through an overzealous BSD installer eating your old partitions. Easy to say back it up! - and you should - but a backup can get eaten by a dog, too. There are two tools available for data recovery - extundelete and PhotoRec. Now, the former only goes after the files still present in your filesystem - even then, I've always had problems actually getting it to do anything; the latter, on the other hand, goes straight to the underlying data. It will recover anything that can be - so let's learn how to use it.Let's say you've had some hacking ^_^ ebooks stored on a pendrive - but you've decided to use it for something else - and now you'd like to bring them back. Type sudo photorec in the terminal and choose the relevant drive. Now press the right arrow twice to enter File Options. Press S to disable all the file types, then scroll down to pdf, press Space and Enter to go back to the main menu. Forget about specific partitions - it might have been repartitioned a thousand times since the data loss - so use the No partition - Whole disk option. Again, filesystem doesn't matter if we're looking through the whole disk, so just select ext3, move the cursor back to Search, and press Enter. Last thing you have to do is choose where the recovered files will be dumped. You can create a new folder "Recovery" inside /home if you want to. Before we start, I should warn you that the dumped files can take quite a lot of space - even all of it - so watch out. Okay, let's press C, and the process can begin.Right away PhotoRec will begin dumping a bunch of files (if it found anything) - and you can explore them real-time. The recovery can take quite long, so be patient. Now remember - PhotoRec goes after the underlying data - so you can find some partial or corrupted files - and the filenames are ignored since they are stored in the filesystem. You might be surprised at what PhotoRec finds - I've seen system-related stuff from like five installations ago, or old pictures I've used for shitposting on chans that I forgot have even existed. To make it easier to find the file you want, sort them by size so the useless &lt;1KB ones will be shown first. If it was a text file, you can also type the command grep -rnw '/home/YourUsername/Recovery' -e 'TextToBeFound', which will search for files containing a particular string inside the Recovery folder. Okay, that's about it for our brief PhotoRec guide (it can do more - search the 'net; the basics are sufficient though). Hook up some old drives and happy hunting!Deploying your system elsewhereMoved to a separate articleUsing ddcutil to control your monitorSince it's annoying to get up and press those unwieldy buttons anytime you want to change color settings or such. First of all, enable the option DDC/CI in your monitor settings if it has that; not all monitors support this standard and laptops apparently don't. If yours doesn't, unfortunately none of this will work. Now install packages ddcutil and i2c-tools if they are not there already; then type sudo modprobe i2c-dev into the terminal. The command sudo ddcutil detect should then show you some information about your monitor. Type sudo ddcutil getvcp KNOWN and you'll get a long output which contains lines such as this:VCP code 0x30 (Vertical Position (Phase)     ): current value =    50, max value =   100
VCP code 0x20 (Horizontal Position (Phase)   ): current value =    50, max value =   100
VCP code 0x12 (Contrast                      ): current value =    75, max value =   100Note the parts starting with 0x - those are the codes for the values you want to edit. So - if you want to change the Contrast - you'll need the 0x12 code number. Now type:sudo ddcutil setvcp 0x12 70This changes the contrast to 70. Of course, the code can be changed to any feature that is supported by your monitor (many won't be and will still require the buttons). Changing the video input source to HDMI:sudo ddcutil setvcp 0x60 3This can be used to e.g enable playing with a Nintendo Switch in docked mode through one command, instead of pressing a bunch of annoying buttons (hell, I know most of the currently produced monitors have the horrible flat ones). Of course, the codes for your device will be different. By the way, if you intend to use this more often, you might want to add the i2c-dev module to /etc/rc.d/rc.modules.local so that it is loaded on boot.Other things to keep in mindALWAYS keep around an USB drive with a Linux Live iso on it!  This will be essential if you render your current installation unbootable; even if you don't manage to recover it, you will be able copy the files you need, and reinstall. Even better - use the instructions from this article and keep THAT USB drive around.To make a command not steal the whole terminal window, add the &amp; character after it (for example, gparted&amp; or gslapt&amp;). If you've already run a command without it, press Ctrl+Z in that terminal window and take note of the number in parentheses that appeared. Then, type bg that number, for example bg 3, which will send the command to the background. You can bring it back to terminal with fg 3.Back to the front page<entry><author><email>digdeeper@disroot.org</email><name>DigDeeper</name><uri>xmpp:diggy@digdeeper.love</uri></author><content xmlns="http://www.w3.org/1999/xhtml" type="xhtml"><div class="section"><h2 id="intro">Introduction</h2><p>The more accurate title would be <strong>the things I do after installing a Linux system to make my experience more comfortable</strong>. Even with such a user-friendly distro as Salix (which this guide will assume - but most of it can be adapted to other distros), it is easy to get overwhelmed, especially for a recent Windows refugee. So, hopefully this article will provide some direction and save you time, effort, and possible frustration for when you break something and / or have to install Linux on another machine.</p></div></content><id>intro</id><summary type="html">&lt;i&gt;Section: Introduction&lt;/i&gt;&lt;hr/&gt;Context: The more accurate title would be the things I do after installing a Linux system to make my experience more comfortable. Even with such a user-friendly distro as Salix (which this guide will assume - but most of it can be adapted to other distros), it is easy to get overwhelmed, especially for a recent Windows refugee. So, hopefully this article will provide some direction and save you time, effort, and possible frustration for when you break something and / or have to install Linux on another machine.</summary><title>Introduction</title></entry><entry><author><email>digdeeper@disroot.org</email><name>DigDeeper</name><uri>xmpp:diggy@digdeeper.love</uri></author><content xmlns="http://www.w3.org/1999/xhtml" type="xhtml"><div class="section"><h2 id="wifi">Manual Wifi configuration</h2><p>Putting this in first since Internet access is required for much of the guide. Since NetworkManager is a famously terrible piece of junk and the Slackware scripts don't always pick the network up, here's how you can do it on your own (WIP):</p><ul><li><span class="list">Type <q>iwconfig</q> or <q>ifconfig</q> to see the name of your interface (say, <q>wlan0</q>).</span></li><li><span class="list">Type <q>sudo iwlist wlan0 scan</q> to see the Wifi networks found. Take note of the one you want to connect to.</span></li><li><span class="list">Type <q>sudo wpa_passphrase my_beautiful_network amazingly_strong_password</q>, filling in the necessary values. Copy the output.</span></li><li><span class="list">Type <q>sudo leafpad /etc/wpa_supplicant.conf</q>. Paste the output and save.</span></li><li><span class="list">Type <q>sudo leafpad /etc/rc.d/rc.inet1.conf</q>. Add this at the end (of course, if you already have another network with the number 4, use a higher number):</span></li></ul><blockquote>IFNAME[4]= "wlan0"<br/>
IPADDR[4]= ""<br/>
NETMASK[4]= ""<br/>
USE_DHCP[4]= "yes"<br/>
DHCP_HOSTNAME[4]= "my_beautiful_network"<br/>
WLAN_WPA[4]= "wpa_supplicant"<br/>
WLAN_WPADRIVER[4]= "wext"<br/></blockquote><p>The Slackware scripts should pick it up on reboot now. To test it out, type <q>sudo sh /etc/rc.d/rc.inet1 wlan0_restart</q>. You can debug the terminal output if it still refuses to work, or inspect <q>/var/log/messages</q> for even more information. Failing that, we can bypass the Slackware scripts and connect with wpa_supplicant directly by typing <q>sudo wpa_supplicant -iwlan0 -c/etc/wpa_supplicant.conf&amp;</q>. This should be foolproof, but in case it's not - the wpa_supplicant log resides in <q>/var/log/wpa_supplicant.log</q>. If you want to connect with wpa_supplicant at every boot (bypassing Slackware scripts), add these commands to <q>/etc/rc.d/rc.local</q>:</p><blockquote>sh /etc/rc.d/rc.inet1 wlan0_stop<br/>
wpa_supplicant -iwlan0 -c/etc/wpa_supplicant.conf&amp;<br/>
dhcpcd&amp;<br/></blockquote><p>In case the network is still failing after reboot, the issue might be resolv.conf not being updated by dhcpcd. If that happens, type <q>sudo resolvconf -l</q> and copy the relevant nameservers. The name of the interface might not be the same as before (for example, I've had it become <q>wlan.ra</q>), so take that into account. Paste the output into <q>/etc/resolv.conf</q>, which should look something like this (of course, the IPs will be different):</p><blockquote># resolv.conf from wlan0.ra<br/>
# Generated by dhcpcd from wlan0.ra<br/>
nameserver 55.55.55.55<br/>
nameserver 33.33.33.33<br/></blockquote></div></content><id>wifi</id><summary type="html">&lt;i&gt;Section: Manual Wifi configuration&lt;/i&gt;&lt;hr/&gt;Context: Putting this in first since Internet access is required for much of the guide. Since NetworkManager is a famously terrible piece of junk and the Slackware scripts don't always pick the network up, here's how you can do it on your own (WIP):IFNAME[4]= "wlan0"
IPADDR[4]= ""
NETMASK[4]= ""
USE_DHCP[4]= "yes"
DHCP_HOSTNAME[4]= "my_beautiful_network"
WLAN_WPA[4]= "wpa_supplicant"
WLAN_WPADRIVER[4]= "wext"</summary><title>Manual Wifi configuration</title></entry><entry><author><email>digdeeper@disroot.org</email><name>DigDeeper</name><uri>xmpp:diggy@digdeeper.love</uri></author><content xmlns="http://www.w3.org/1999/xhtml" type="xhtml"><div class="subsection"><h3 id="repos">Adding repositories</h3><p>Now, Salix repositories are quite large and should be enough to get you started, but someday you will need to branch out. The defaults are limited to packages from Slackware 14.2, while sometime you just might need a newer version (for example, certain python3 applications require 3.6 which Salix does not provide). Some packages are also not available at all, such as SpaceFM, my favorite file manager. In come the Slackel (http://www.slackel.gr/repo/x86_64/current/) and SlackOnly (https://packages.slackonly.com/pub/packages/14.2-x86_64/) repositories. Just start up Gslapt, go to Preferences - Sources, click Add, and copy those links. Remember, though, that <strong>you can easily break shit</strong> if you aren't careful - a repo can, for example, pull in a library that a package requires, and that one will replace the one you had before - breaking everything that was dependent on it. There are also other available repositories, such as Ponce or Alien - search around!</p></div></content><id>repos</id><summary type="html">&lt;i&gt;Section: Application-related&lt;/i&gt;&lt;hr/&gt;Context: Now, Salix repositories are quite large and should be enough to get you started, but someday you will need to branch out. The defaults are limited to packages from Slackware 14.2, while sometime you just might need a newer version (for example, certain python3 applications require 3.6 which Salix does not provide). Some packages are also not available at all, such as SpaceFM, my favorite file manager. In come the Slackel (http://www.slackel.gr/repo/x86_64/current/) and SlackOnly (https://packages.slackonly.com/pub/packages/14.2-x86_64/) repositories. Just start up Gslapt, go to Preferences - Sources, click Add, and copy those links. Remember, though, that you can easily break shit if you aren't careful - a repo can, for example, pull in a library that a package requires, and that one will replace the one you had before - breaking everything that was dependent on it. There are also other available repositories, such as Ponce or Alien - search around!</summary><title>Adding repositories</title></entry><entry><author><email>digdeeper@disroot.org</email><name>DigDeeper</name><uri>xmpp:diggy@digdeeper.love</uri></author><content xmlns="http://www.w3.org/1999/xhtml" type="xhtml"><div class="subsection"><h3 id="packages">Installing and removing packages</h3><p>It is hard for a distro to contain everything you need and nothing else - in fact, it is impossible (but Salix comes close). So you will always have to add and remove something. You can use the repositories you've added in the previous step - or, another nice way to install a particular package you need is to use SlakFinder (http://slakfinder.org/ - here are my <a href="https://mycroftproject.com/search-engines.html?name=slakfinder">search plugins</a> for its easier usage). This website allows you to type a package name (even partial) and it will show you all the repositories you can download it from (including the links!). You will have to use the <strong>installpkg</strong> command to use those. This way will also not bring in any dependencies, which has its advantages (no breakage) and disadvantages (package might not work). Note: if you want to skip installing dependencies, you can use the <strong>Download packages only</strong> option in Gslapt - or find a repository that doesn't contain dependency information. I will assume you've managed to install everything you need without breaking anything (harder than it sounds sometimes). Slapt-get (what Gslapt uses) keeps all its installed packages in /var/slapt-get/, so I recommend copying those to a pendrive. This way, if you ever install Salix elsewhere, you can immediately bring it to your preferred state by running the command "sudo installpkg ./*" while inside the folder you've stored them in. And you won't even have to connect to the Internet anymore to download those packages.</p></div></content><id>packages</id><link rel="related" href="https://mycroftproject.com/search-engines.html?name=slakfinder" title="search plugins"/><summary type="html">&lt;i&gt;Section: Application-related&lt;/i&gt;&lt;hr/&gt;Context: It is hard for a distro to contain everything you need and nothing else - in fact, it is impossible (but Salix comes close). So you will always have to add and remove something. You can use the repositories you've added in the previous step - or, another nice way to install a particular package you need is to use SlakFinder (http://slakfinder.org/ - here are my search plugins for its easier usage). This website allows you to type a package name (even partial) and it will show you all the repositories you can download it from (including the links!). You will have to use the installpkg command to use those. This way will also not bring in any dependencies, which has its advantages (no breakage) and disadvantages (package might not work). Note: if you want to skip installing dependencies, you can use the Download packages only option in Gslapt - or find a repository that doesn't contain dependency information. I will assume you've managed to install everything you need without breaking anything (harder than it sounds sometimes). Slapt-get (what Gslapt uses) keeps all its installed packages in /var/slapt-get/, so I recommend copying those to a pendrive. This way, if you ever install Salix elsewhere, you can immediately bring it to your preferred state by running the command "sudo installpkg ./*" while inside the folder you've stored them in. And you won't even have to connect to the Internet anymore to download those packages.</summary><title>Installing and removing packages</title></entry><entry><author><email>digdeeper@disroot.org</email><name>DigDeeper</name><uri>xmpp:diggy@digdeeper.love</uri></author><content xmlns="http://www.w3.org/1999/xhtml" type="xhtml"><div class="subsection"><h3 id="otherdistros">Packages from other distros</h3><p>Unfortunately for us Slackware-based distribution users, Ubuntu / Debian are the primary target for many Linux developers. Therefore, many packages <strong>cannot be found</strong> in the Slackware .t*z format, but can in .deb or sometimes Red Hat's .rpm. What to do then? <strong>deb2tgz</strong> and <strong>rpm2tgz</strong> to the rescue. These scripts allow you to convert any .deb or .rpm package so that it is compatible with Slackware-based distros. deb2tgz is found in the SlackOnly repository, while rpm2tgz - in the Salix one.</p></div></content><id>otherdistros</id><summary type="html">&lt;i&gt;Section: Application-related&lt;/i&gt;&lt;hr/&gt;Context: Unfortunately for us Slackware-based distribution users, Ubuntu / Debian are the primary target for many Linux developers. Therefore, many packages cannot be found in the Slackware .t*z format, but can in .deb or sometimes Red Hat's .rpm. What to do then? deb2tgz and rpm2tgz to the rescue. These scripts allow you to convert any .deb or .rpm package so that it is compatible with Slackware-based distros. deb2tgz is found in the SlackOnly repository, while rpm2tgz - in the Salix one.</summary><title>Packages from other distros</title></entry><entry><author><email>digdeeper@disroot.org</email><name>DigDeeper</name><uri>xmpp:diggy@digdeeper.love</uri></author><content xmlns="http://www.w3.org/1999/xhtml" type="xhtml"><div class="subsection"><h3 id="panel">Add commonly-used applications to the panel</h3><p>By default, Salix includes only a few generic icons on the panel - the terminal, text editor, file manager and web browser. But of course you will use so much more of them - so why not put the most used ones in there as well? Let's add a music player - right click the panel, hover over Panel, and click Add new items. Now choose Launcher and click Add. An empty icon will appear in there - right click it and choose "Properties". Now click the plus button. Type the name of your music player (for example QuodLibet) or find it in the list of applications, then click on it and use the Add option to put it in the panel. Close the launcher editor, right click the icon that appeared, and Move it to wherever it is convenient for you. You will probably install packages pretty often, so let's add Gslapt in there as well. Then the mail client, painting program, IDE, and movie player. You're all set! The result should look something like this: <br/><img class="center" width="495" height="33" src="/images/panel.png" alt="XFCE panel with various programs in it"/><br/>
This should heavily boost your productivity - no more clicking around to find the program you're looking for. The panel settings (as well as other Xfce-related ones) are stored in <strong>/home/YourUsername/.config/xfce4/</strong>, so you can easily copy them to a pendrive or something. And if you break Linux on this machine, you can just reinstall it and keep the home partition, so the settings will be carried over.</p></div></content><id>panel</id><link rel="enclosure" href="/images/panel.png" title="XFCE panel with various programs in it" type="image/png"/><summary type="html">&lt;i&gt;Section: Application-related&lt;/i&gt;&lt;hr/&gt;Context: By default, Salix includes only a few generic icons on the panel - the terminal, text editor, file manager and web browser. But of course you will use so much more of them - so why not put the most used ones in there as well? Let's add a music player - right click the panel, hover over Panel, and click Add new items. Now choose Launcher and click Add. An empty icon will appear in there - right click it and choose "Properties". Now click the plus button. Type the name of your music player (for example QuodLibet) or find it in the list of applications, then click on it and use the Add option to put it in the panel. Close the launcher editor, right click the icon that appeared, and Move it to wherever it is convenient for you. You will probably install packages pretty often, so let's add Gslapt in there as well. Then the mail client, painting program, IDE, and movie player. You're all set! The result should look something like this: 
This should heavily boost your productivity - no more clicking around to find the program you're looking for. The panel settings (as well as other Xfce-related ones) are stored in /home/YourUsername/.config/xfce4/, so you can easily copy them to a pendrive or something. And if you break Linux on this machine, you can just reinstall it and keep the home partition, so the settings will be carried over.</summary><title>Add commonly-used applications to the panel</title></entry><entry><author><email>digdeeper@disroot.org</email><name>DigDeeper</name><uri>xmpp:diggy@digdeeper.love</uri></author><content xmlns="http://www.w3.org/1999/xhtml" type="xhtml"><div class="subsection"><h3 id="themes">Themes</h3><p>Let's face it, Xfce's default look <strong>sucks</strong>. And all its default themes also <strong>suck</strong>. Now you can install the murrine engine and its associated themes, but they are only slightly better. Chances are, if you want to actually enjoy looking at your computer, you will need to peruse the website <strong>https://xfce-look.org/</strong>. But first, go to Settings &gt; Settings manager and let's see how the look of Xfce is actually decided. You can divide it into five parts:</p><ul><li><span class="list">Theme (the color scheme of everything except the title bar - set through the Appearance menu)</span></li><li><span class="list">Icons (also Appearance menu)</span></li><li><span class="list">Wallpaper (in Desktop)</span></li><li><span class="list">Title bar (colour and buttons; in Window Manager menu)</span></li><li><span class="list">Cursors (in Mouse and Touchpad &gt; Theme).</span></li></ul><p>Now wouldn't it be nice to have all these put together, instead of scattered around? Download the package Xfce-theme-manager (find it through the aforementioned SlakFinder). Now a new section will appear in your Settings Manager. There you can modify all the settings as well as some additional ones - and save them as actual whole themes. Anyway, visit <strong>https://xfce-look.org/</strong> and look around. First, time to dump the boring single-colored cursors. Let's have some fun - how about a <strong><a href="https://www.xfce-look.org/p/999888/">fucking Katana</a></strong> as your cursor - download it by - you guessed it - clicking the Download btton. To install the cursor set, move the archive to /usr/share/icons, open it in Engrampa and extract the folder that is INSIDE - just extracting the archive will create a folder with its name, <strong>and the theme will not work</strong>. Some of my favorites are <a href="https://www.xfce-look.org/p/999770/">Charged</a>, <a href="https://www.xfce-look.org/p/999438/">Dragon"s Jewel</a>, and <a href="https://www.xfce-look.org/p/999687/">Dragon Claw</a>. Keep in mind anyone could submit a theme, so there's bound to be a few low quality or even incomplete ones. Now do the same for Icon Themes and XFCE/XFWM4 Themes (extracted in /usr/share/themes) and you're all set! Note: while seeking themes, try to find ones that have GTK3 support instead of just GTK2; otherwise, the GTK3 programs will use the default look and seem out of place compared to the GTK2 ones (edit: or trash gtk3 altogether, then you can use all the gtk2-only themes). As for the wallpaper - well, you can get it from anywhere - any png/jpg image will work. Put them in /usr/share/xfce4/backdrops/ to have them displayed in the settings manager. It is also possible to edit a theme (or create your own, but that's way too much effort) - for that, go to your theme's folder, then gtk2.0 and open the <q>gtkrc</q> file in your favorite text editor. There's really no proper documentation for doing this, so you'll have to figure out what stuff means on your own.</p></div></content><id>themes</id><link rel="related" href="https://www.xfce-look.org/p/999888/" title="fucking Katana"/><link rel="related" href="https://www.xfce-look.org/p/999770/" title="Charged"/><link rel="related" href="https://www.xfce-look.org/p/999438/" title="Dragon&quot;s Jewel"/><link rel="related" href="https://www.xfce-look.org/p/999687/" title="Dragon Claw"/><summary type="html">&lt;i&gt;Section: Making it look good&lt;/i&gt;&lt;hr/&gt;Context: Let's face it, Xfce's default look sucks. And all its default themes also suck. Now you can install the murrine engine and its associated themes, but they are only slightly better. Chances are, if you want to actually enjoy looking at your computer, you will need to peruse the website https://xfce-look.org/. But first, go to Settings &gt; Settings manager and let's see how the look of Xfce is actually decided. You can divide it into five parts:</summary><title>Themes</title></entry><entry><author><email>digdeeper@disroot.org</email><name>DigDeeper</name><uri>xmpp:diggy@digdeeper.love</uri></author><content xmlns="http://www.w3.org/1999/xhtml" type="xhtml"><div class="subsection"><h3 id="others">Other settings you can change</h3><p>Lots! Let's go through them one by one:</p><ul><li><span class="list"><strong>Screensaver</strong></span></li></ul><p> - you're a lucky guy; there are a lot of them <strong>by default</strong>! Even a fucking Pacman one. Find them in Settings &gt; Screensaver. Some fun ones are Kumppa, Fireworkx, or BinaryRing.</p><ul><li><span class="list"><strong>Transparency</strong></span></li></ul><p> - a common criticism of "ricing" is that you never see your wallpaper. Well, not if you have this enabled! Go to Window Manager Tweaks &gt; Compositor, enable it if it isn't already, and choose your preferred transparency levels for inactive and moving windows. I recommend making them mostly transparent. While we're here, turn on your Terminal emulator (if you're new to Linux - trust me, you will use this a lot) and change its transparency as well (Edit &gt; Preferences &gt; Appearance. Background &gt; Transparent).</p><ul><li><span class="list"><strong>Screen resolution</strong></span></li></ul><p> - self explanatory. It's in the Display section of the Settings Manager.</p><ul><li><span class="list"><strong>The look during Alt+Tabbing</strong></span></li></ul><p> - it's in Window Manager Tweaks &gt; Compositor, specifically the <strong>Show windows preview in place of icons when cycling.</strong>. I think this should be disabled, because it's fucking ugly.</p><ul><li><span class="list"><strong>Font family and size</strong></span></li></ul><p> - Appearance &gt; Fonts.</p><ul><li><span class="list"><strong>Desktop icons</strong></span></li></ul><p> - Desktop &gt; Icons. I recommend deleting them all, to see the wallpaper in all its glory.</p><ul><li><span class="list"><strong>Terminal colors</strong></span></li></ul><p> - Lime on black, hacker style ^_^</p><ul><li><span class="list"><strong>Changing the look of specific icons</strong> - You can do that too. Right click on an application on the panel, Edit Launcher and click on its icon. By using the "Image files" option and combing through the folders in /usr/share/icons/, you can use icons from many different themes at the same time, or even your own custom ones.</span></li></ul><p>If you want to create a new panel, right click an existing one and navigate to Panel &gt; Panel Preferences, then click the + button. There you can choose its properties such as size or whether it will hide itself when the cursor is away. You can use it, for example, to display the currently active applications at the top while you hover over there. Okay, that's about as much as you can do with pure Xfce. The final result might look something like this: <img width="1280" height="800" class="center" src="/images/rice.png" alt="Showing my full Linux desktop"/> There are some other tools for more heavy ricing that I might describe someday; for now though, let's move on to functionality.</p></div></content><id>others</id><link rel="enclosure" href="/images/rice.png" title="Showing my full Linux desktop" type="image/png"/><summary type="html">&lt;i&gt;Section: Making it look good&lt;/i&gt;&lt;hr/&gt;Context: Lots! Let's go through them one by one:</summary><title>Other settings you can change</title></entry><entry><author><email>digdeeper@disroot.org</email><name>DigDeeper</name><uri>xmpp:diggy@digdeeper.love</uri></author><content xmlns="http://www.w3.org/1999/xhtml" type="xhtml"><div class="subsection"><h3 id="browser">Web Browser</h3><p>If you're like me, you will be spending much of your computer time browsing the Internet. So why not prepare it for this - as we will see - gargantuan task now? First of all - the browser choice. Refer to my other article - <a href="./browsers.xhtml">How to choose a browser for your daily use?</a> - for advice on this topic. Time to harden it with addons (if it supports them - but if you read the linked article, you will hopefully see how essential they are). <a href="./addons.xhtml">Essential privacy (and other) addons</a>. Now let's set up our search engines. Pale Moon will detect most of them when visited and you can add them then. To test it out, go to <a href="https://metager.de">https://metager.de</a>, press the small black arrow near the search bar, and then "Add Metager". Now you can select it from the dropdown list and it will become the default in the search bar. Another way to add them is finding a plugin from <a href="https://mycroftproject.com/">https://mycroftproject.com/</a> for the website you want to search through. After you've added all the ones you want, use the Manage Search Engines menu (black arrow again) to set keyboard shortcuts for them. This will allow you to use any search engine in the address bar by typing their shortcut (e.g ddg for DuckDuckGo) followed by the query - very convenient. If you've settled on a Chrome-based browser, it will <strong>detect whenever you use a search engine</strong>, and automatically add it to the settings menu. Go there and click "Manage search engines". There, you will have a list of all the ones you've ever used - so if you searched for something with SlakFinder, you can now set a keyword for it. Click on the three dots to the right of it, Edit, and put "sf" as the keyword. Now you can perform a SlakFinder search by typing <strong>sf your-search-term</strong> in the address bar. Pretty convenient, huh? Now do the same for StartPage (keyword sp) and DuckDuckGo (keyword ddg), as well as any others you want. Note: you should also configure a VPN and / or Tor for your web browsing. Refer to <a href="./vpn.xhtml">How and why to VPNize your entire traffic</a> and <a href="./darknetslack.xhtml">Darknet setup in Slackware-based distros</a>.</p></div></content><id>browser</id><link rel="related" href="./browsers.xhtml" title="How to choose a browser for your daily use?"/><link rel="related" href="./addons.xhtml" title="Essential privacy (and other) addons"/><link rel="related" href="https://metager.de" title="https://metager.de"/><link rel="related" href="https://mycroftproject.com/" title="https://mycroftproject.com/"/><link rel="related" href="./vpn.xhtml" title="How and why to VPNize your entire traffic"/><link rel="related" href="./darknetslack.xhtml" title="Darknet setup in Slackware-based distros"/><summary type="html">&lt;i&gt;Section: Set up everyday software&lt;/i&gt;&lt;hr/&gt;Context: If you're like me, you will be spending much of your computer time browsing the Internet. So why not prepare it for this - as we will see - gargantuan task now? First of all - the browser choice. Refer to my other article - How to choose a browser for your daily use? - for advice on this topic. Time to harden it with addons (if it supports them - but if you read the linked article, you will hopefully see how essential they are). Essential privacy (and other) addons. Now let's set up our search engines. Pale Moon will detect most of them when visited and you can add them then. To test it out, go to https://metager.de, press the small black arrow near the search bar, and then "Add Metager". Now you can select it from the dropdown list and it will become the default in the search bar. Another way to add them is finding a plugin from https://mycroftproject.com/ for the website you want to search through. After you've added all the ones you want, use the Manage Search Engines menu (black arrow again) to set keyboard shortcuts for them. This will allow you to use any search engine in the address bar by typing their shortcut (e.g ddg for DuckDuckGo) followed by the query - very convenient. If you've settled on a Chrome-based browser, it will detect whenever you use a search engine, and automatically add it to the settings menu. Go there and click "Manage search engines". There, you will have a list of all the ones you've ever used - so if you searched for something with SlakFinder, you can now set a keyword for it. Click on the three dots to the right of it, Edit, and put "sf" as the keyword. Now you can perform a SlakFinder search by typing sf your-search-term in the address bar. Pretty convenient, huh? Now do the same for StartPage (keyword sp) and DuckDuckGo (keyword ddg), as well as any others you want. Note: you should also configure a VPN and / or Tor for your web browsing. Refer to How and why to VPNize your entire traffic and Darknet setup in Slackware-based distros.</summary><title>Web Browser</title></entry><entry><author><email>digdeeper@disroot.org</email><name>DigDeeper</name><uri>xmpp:diggy@digdeeper.love</uri></author><content xmlns="http://www.w3.org/1999/xhtml" type="xhtml"><div class="subsection"><h3 id="geany">Text Editor / IDE</h3><p>If you are a developer, Geany is a great, lean tool to use and installed by default in Salix. What I like to do here is first to <strong>create some projects</strong> using the <q>Project &gt; New</q> option. With this, you will be able to switch through different projects with three clicks and have all their files loaded. Very useful if you - for example - both develop a website and create software. The nice thing about this is that you can <strong>search and replace a string in all loaded files</strong> (Ctrl+H -&gt; Replace all in session). Makes it much more convenient to do mass modifications. Another feature I like to use is <strong>templates</strong> - if you are going to be creating documents that look the same just with different content, templates are invaluable. Create a skeleton of your file with all the content removed and put it in <strong>/usr/share/geany/templates/files/</strong>. Then, anytime you want to make a new document you can do that in 3 clicks with File -&gt; New with template and then choose the template. Very convenient! Macros are another thing you should really try to learn (Tools -&gt; Edit macros) - these allow you to make more complex modifications to a document, but they can be kind of hard to use. Though with a little bit of effort they can automate lots of tedious work. Another thing to take note of are the navigation keyboard shortcuts (move to next word, delete current line, etc) which again streamline the development. <strong>UPDATE April 2025</strong>: newest Geany seems to have removed the underscore as a "word boundary" (basically any character that "stops" jumping between words with CTRL+left / right arrow). This was unacceptable to me as my images are all named like "my_awesome_image.png" and sometimes it's really necessary for me to quickly change the "awesome" to "horrible" or something like that. So I set out on the journey to figure this out and I did. Go to <em>Tools</em> - <em>Configuration files</em> -&gt; <em>filetypes.common</em> and find this section:</p><blockquote>#~ [settings]<br/>
#~ # which characters should be skipped when moving (or included when deleting) to word boundaries<br/>
#~ should always include space and tab (\s\t)<br/>
#~ whitespace_chars=\s\t!\"#$%&amp;'()*+,-./:;&lt;=&gt;?@[\\]^`{|}~<br/>
#~ wordchars=_abcdefghijklmnopqrstuvwxyzABCDEFGHIJKLMNOPQRSTUVWXYZ0123456789</blockquote><p>First, uncomment the first line, which enables the entire config section. Then, uncomment the whitespace and wordchars lines. As you can see, the last line contains the underscore, meaning it's going to be considered a "letter" by geany, and won't stop the "fast travel". Delete it. Then add an underscore to the previous line, which defines the characters that actually <strong>do</strong> stop the "fast travel". I like adding it to the end of the line. The final section will look like this:</p><blockquote>[settings]<br/>
#~ # which characters should be skipped when moving (or included when deleting) to word boundaries<br/>
#~ # should always include space and tab (\s\t)<br/>
whitespace_chars=\s\t!\"#$%&amp;'()*+,-./:;&lt;=&gt;?@[\\]^`{|}~_<br/>
wordchars=abcdefghijklmnopqrstuvwxyzABCDEFGHIJKLMNOPQRSTUVWXYZ0123456789</blockquote><p>After that, go to <em>Tools</em> and click <em>Reload configuration</em>. Everything should work properly after that.</p></div></content><id>geany</id><summary type="html">&lt;i&gt;Section: Set up everyday software&lt;/i&gt;&lt;hr/&gt;Context: If you are a developer, Geany is a great, lean tool to use and installed by default in Salix. What I like to do here is first to create some projects using the Project &gt; New option. With this, you will be able to switch through different projects with three clicks and have all their files loaded. Very useful if you - for example - both develop a website and create software. The nice thing about this is that you can search and replace a string in all loaded files (Ctrl+H -&gt; Replace all in session). Makes it much more convenient to do mass modifications. Another feature I like to use is templates - if you are going to be creating documents that look the same just with different content, templates are invaluable. Create a skeleton of your file with all the content removed and put it in /usr/share/geany/templates/files/. Then, anytime you want to make a new document you can do that in 3 clicks with File -&gt; New with template and then choose the template. Very convenient! Macros are another thing you should really try to learn (Tools -&gt; Edit macros) - these allow you to make more complex modifications to a document, but they can be kind of hard to use. Though with a little bit of effort they can automate lots of tedious work. Another thing to take note of are the navigation keyboard shortcuts (move to next word, delete current line, etc) which again streamline the development. UPDATE April 2025: newest Geany seems to have removed the underscore as a "word boundary" (basically any character that "stops" jumping between words with CTRL+left / right arrow). This was unacceptable to me as my images are all named like "my_awesome_image.png" and sometimes it's really necessary for me to quickly change the "awesome" to "horrible" or something like that. So I set out on the journey to figure this out and I did. Go to Tools - Configuration files -&gt; filetypes.common and find this section:#~ [settings]
#~ # which characters should be skipped when moving (or included when deleting) to word boundaries
#~ should always include space and tab (\s\t)
#~ whitespace_chars=\s\t!\"#$%&amp;'()*+,-./:;&lt;=&gt;?@[\\]^`{|}~
#~ wordchars=_abcdefghijklmnopqrstuvwxyzABCDEFGHIJKLMNOPQRSTUVWXYZ0123456789</summary><title>Text Editor / IDE</title></entry><entry><author><email>digdeeper@disroot.org</email><name>DigDeeper</name><uri>xmpp:diggy@digdeeper.love</uri></author><content xmlns="http://www.w3.org/1999/xhtml" type="xhtml"><div class="subsection"><h3 id="spacefm">File manager</h3><p>Another one you'll be spending some time on. This guide will assume you are using <strong>SpaceFM</strong>, since it is simply the most powerful one. What can it do?</p><ul><li><span class="list"><strong>Create custom commands</strong> - see <a href="./software.xhtml">here</a>.</span></li><li><span class="list"><strong>Set up key shortcuts</strong> - for like everything. Right click any item and then Key Shortcut.</span></li><li><span class="list"><strong>Create bookmarks</strong> - Navigate to a folder you want to add, then click Bookmarks -&gt; New Bookmark. Right click the bookmark that has appeared to set its icon or key shortcut.</span></li><li><span class="list"><strong>Set global mount options for devices</strong> - right click on a device, then Settings -&gt; Mount Options. If you want to do that for a specific device, use the Re/Mount option. Some useful ones are rw and sync especially for MP3 players (without sync, the files don't seem to be saved to the player at all, even if you sync manually).</span></li><li><span class="list"><strong>Modify the toolbar</strong> - right click it to see all the options. Can add bookmarks, commands, applications, move stuff around, remove buttons already there, etc.</span></li><li><span class="list"><strong>Lots and lots of others!</strong> SpaceFM's power is truly <strong>galactical</strong> - I don't even know half of it. Explore!</span></li></ul></div></content><id>spacefm</id><link rel="related" href="./software.xhtml" title="here"/><summary type="html">&lt;i&gt;Section: Set up everyday software&lt;/i&gt;&lt;hr/&gt;Context: Another one you'll be spending some time on. This guide will assume you are using SpaceFM, since it is simply the most powerful one. What can it do?</summary><title>File manager</title></entry><entry><author><email>digdeeper@disroot.org</email><name>DigDeeper</name><uri>xmpp:diggy@digdeeper.love</uri></author><content xmlns="http://www.w3.org/1999/xhtml" type="xhtml"><div class="subsection"><h3 id="aliases">Terminal aliases</h3><p>Let's face it - it can get tedious to type the same long terminal commands all the time. Aliases to the rescue! In your home directory, create a file named <strong>.bash_aliases</strong> - yes, with the dot - and put this line there: <strong>alias sli= "sudo slapt-get install"</strong>. Since you will most likely be using slapt-get quite a bit, this will bind it to the shortcut <strong>sli</strong>. And you can do that for any command just by putting an alias in a new line. Keep in mind you have to log out to have the shortcuts be applied.</p></div></content><id>aliases</id><summary type="html">&lt;i&gt;Section: Life savers / enhancers&lt;/i&gt;&lt;hr/&gt;Context: Let's face it - it can get tedious to type the same long terminal commands all the time. Aliases to the rescue! In your home directory, create a file named .bash_aliases - yes, with the dot - and put this line there: alias sli= "sudo slapt-get install". Since you will most likely be using slapt-get quite a bit, this will bind it to the shortcut sli. And you can do that for any command just by putting an alias in a new line. Keep in mind you have to log out to have the shortcuts be applied.</summary><title>Terminal aliases</title></entry><entry><author><email>digdeeper@disroot.org</email><name>DigDeeper</name><uri>xmpp:diggy@digdeeper.love</uri></author><content xmlns="http://www.w3.org/1999/xhtml" type="xhtml"><div class="subsection"><h3 id="hardinfo">Hardinfo</h3><p>Just a program that shows you all the hardware you have - something that should really be there by default, but somehow isn't. Available in the default repos.</p></div></content><id>hardinfo</id><summary type="html">&lt;i&gt;Section: Life savers / enhancers&lt;/i&gt;&lt;hr/&gt;Context: Just a program that shows you all the hardware you have - something that should really be there by default, but somehow isn't. Available in the default repos.</summary><title>Hardinfo</title></entry><entry><author><email>digdeeper@disroot.org</email><name>DigDeeper</name><uri>xmpp:diggy@digdeeper.love</uri></author><content xmlns="http://www.w3.org/1999/xhtml" type="xhtml"><div class="subsection"><h3 id="photorec">Data recovery</h3><p>It is inevitable that you will lose some of your data sooner or later - whether through power, hardware, or system failure; accidentally (or on purpose - and then regretting it) deleting it, or through an overzealous BSD installer eating your old partitions. Easy to say <strong>back it up!</strong> - and you should - but a backup can get eaten by a dog, too. There are two tools available for data recovery - extundelete and PhotoRec. Now, the former only goes after the files <strong>still present in your filesystem</strong> - even then, I've always had problems actually getting it to do anything; the latter, on the other hand, goes straight to the underlying data. It will recover anything that can be - so let's learn how to use it.</p><p>Let's say you've had some hacking ^_^ ebooks stored on a pendrive - but you've decided to use it for something else - and now you'd like to bring them back. Type <strong>sudo photorec</strong> in the terminal and choose the relevant drive. Now press the right arrow twice to enter File Options. Press S to disable all the file types, then scroll down to <strong>pdf</strong>, press Space and Enter to go back to the main menu. Forget about specific partitions - it might have been repartitioned a thousand times since the data loss - so use the <strong>No partition - Whole disk</strong> option. Again, filesystem doesn't matter if we're looking through the whole disk, so just select ext3, move the cursor back to Search, and press Enter. Last thing you have to do is choose where the recovered files will be dumped. You can create a new folder "Recovery" inside /home if you want to. Before we start, I should warn you that the dumped files can take quite a lot of space - even <strong>all of it</strong> - so watch out. Okay, let's press C, and the process can begin.</p><p>Right away PhotoRec will begin dumping a bunch of files (if it found anything) - and you can explore them real-time. The recovery can take quite long, so be patient. Now remember - PhotoRec goes <strong>after the underlying data</strong> - so you can find some partial or corrupted files - and the filenames are ignored since they are stored in the filesystem. You might be surprised at what PhotoRec finds - I've seen system-related stuff from like five installations ago, or old pictures I've used for shitposting on chans that I forgot have even existed. To make it easier to find the file you want, sort them by size so the useless &lt;1KB ones will be shown first. If it was a text file, you can also type the command <q>grep -rnw '/home/YourUsername/Recovery' -e 'TextToBeFound'</q>, which will search for files containing a particular string inside the Recovery folder. Okay, that's about it for our brief PhotoRec guide (it can do more - search the 'net; the basics are sufficient though). Hook up some old drives and happy hunting!</p></div></content><id>photorec</id><summary type="html">&lt;i&gt;Section: Life savers / enhancers&lt;/i&gt;&lt;hr/&gt;Context: It is inevitable that you will lose some of your data sooner or later - whether through power, hardware, or system failure; accidentally (or on purpose - and then regretting it) deleting it, or through an overzealous BSD installer eating your old partitions. Easy to say back it up! - and you should - but a backup can get eaten by a dog, too. There are two tools available for data recovery - extundelete and PhotoRec. Now, the former only goes after the files still present in your filesystem - even then, I've always had problems actually getting it to do anything; the latter, on the other hand, goes straight to the underlying data. It will recover anything that can be - so let's learn how to use it.</summary><title>Data recovery</title></entry><entry><author><email>digdeeper@disroot.org</email><name>DigDeeper</name><uri>xmpp:diggy@digdeeper.love</uri></author><content xmlns="http://www.w3.org/1999/xhtml" type="xhtml"><div class="subsection"><h3 id="deploy">Deploying your system elsewhere</h3><p>Moved to a <a href="./backup.xhtml">separate article</a></p></div></content><id>deploy</id><link rel="related" href="./backup.xhtml" title="separate article"/><summary type="html">&lt;i&gt;Section: Life savers / enhancers&lt;/i&gt;&lt;hr/&gt;Context: Moved to a separate article</summary><title>Deploying your system elsewhere</title></entry><entry><author><email>digdeeper@disroot.org</email><name>DigDeeper</name><uri>xmpp:diggy@digdeeper.love</uri></author><content xmlns="http://www.w3.org/1999/xhtml" type="xhtml"><div class="subsection"><h3 id="ddcutil">Using ddcutil to control your monitor</h3><p>Since it's annoying to get up and press those unwieldy buttons anytime you want to change color settings or such. First of all, enable the option <em>DDC/CI</em> in your monitor settings if it has that; <strong>not all monitors support this standard</strong> and laptops apparently don't. If yours doesn't, unfortunately none of this will work. Now install packages <em>ddcutil</em> and <em>i2c-tools</em> if they are not there already; then type <q>sudo modprobe i2c-dev</q> into the terminal. The command <q>sudo ddcutil detect</q> should then show you some information about your monitor. Type <q>sudo ddcutil getvcp KNOWN</q> and you'll get a long output which contains lines such as this:</p><blockquote>VCP code 0x30 (Vertical Position (Phase)     ): current value =    50, max value =   100<br/>
VCP code 0x20 (Horizontal Position (Phase)   ): current value =    50, max value =   100<br/>
VCP code 0x12 (Contrast                      ): current value =    75, max value =   100<br/></blockquote><p>Note the parts starting with <q>0x</q> - those are the codes for the values you want to edit. So - if you want to change the <q>Contrast</q> - you'll need the <q>0x12</q> code number. Now type:</p><blockquote>sudo ddcutil setvcp 0x12 70</blockquote><p>This changes the contrast to 70. Of course, the code can be changed to any feature that is supported by your monitor (many won't be and will still require the buttons). Changing the video input source to HDMI:</p><blockquote>sudo ddcutil setvcp 0x60 3</blockquote><p>This can be used to e.g enable playing with a Nintendo Switch in docked mode through one command, instead of pressing a bunch of annoying buttons (hell, I know most of the currently produced monitors have the horrible flat ones). Of course, the codes for your device will be different. By the way, if you intend to use this more often, you might want to add the <em>i2c-dev</em> module to <em>/etc/rc.d/rc.modules.local</em> so that it is loaded on boot.</p></div></content><id>ddcutil</id><summary type="html">&lt;i&gt;Section: Life savers / enhancers&lt;/i&gt;&lt;hr/&gt;Context: Since it's annoying to get up and press those unwieldy buttons anytime you want to change color settings or such. First of all, enable the option DDC/CI in your monitor settings if it has that; not all monitors support this standard and laptops apparently don't. If yours doesn't, unfortunately none of this will work. Now install packages ddcutil and i2c-tools if they are not there already; then type sudo modprobe i2c-dev into the terminal. The command sudo ddcutil detect should then show you some information about your monitor. Type sudo ddcutil getvcp KNOWN and you'll get a long output which contains lines such as this:VCP code 0x30 (Vertical Position (Phase)     ): current value =    50, max value =   100
VCP code 0x20 (Horizontal Position (Phase)   ): current value =    50, max value =   100
VCP code 0x12 (Contrast                      ): current value =    75, max value =   100</summary><title>Using ddcutil to control your monitor</title></entry><entry><author><email>digdeeper@disroot.org</email><name>DigDeeper</name><uri>xmpp:diggy@digdeeper.love</uri></author><content xmlns="http://www.w3.org/1999/xhtml" type="xhtml"><div class="section"><h2 id="stuff">Other things to keep in mind</h2><ul><li><span class="list"><strong>ALWAYS keep around an USB drive with a Linux Live iso on it! </strong> This will be essential if you render your current installation unbootable; even if you don't manage to recover it, you will be able copy the files you need, and reinstall. Even better - use the instructions from <a href="./backup.xhtml">this article</a> and keep THAT USB drive around.</span></li><li><span class="list">To make a command not steal the whole terminal window, add the <q>&amp;</q> character after it (for example, <q>gparted&amp;</q> or <q>gslapt&amp;</q>). If you've already run a command without it, press Ctrl+Z in that terminal window and take note of the number in parentheses that appeared. Then, type <q>bg that number</q>, for example <q>bg 3</q>, which will send the command to the background. You can bring it back to terminal with <q>fg 3</q>.</span></li></ul></div></content><id>stuff</id><link rel="related" href="./backup.xhtml" title="this article"/><summary type="html">&lt;i&gt;Section: Other things to keep in mind&lt;/i&gt;&lt;hr/&gt;Context: </summary><title>Other things to keep in mind</title></entry></feed>